Frida usage basics
This chapter introduces the basic usage of Frida, which includes learning how tools based on Frida work but also the usage of the frida-tools package, Frida’s CLI (Command Line Interface) as well as making our basic instrumentation scripts.
Before going on, be sure to install frida and frida-tools packages using Python's pip:
$ pip install frida frida-tools
The frida package includes the libraries that can be used from Python and the frida-tools package include the prebuilt command line tools of Frida. For more information on the frida-tools package refer to Section 5.2. frida-tools.
Important: From now on, whenever frida is mentioned it refers to Frida's CLI. Whenever Frida (in capital letters) is mentioned the text refers to the toolkit as a whole.
Frida development can be done using JavaScript or TypeScript although the later is transpiled into compatible JavaScript, in the next section the differences between both are shown.
JavaScript vs TypeScript
Frida supports writing instrumentation code in JavaScript(JS) and TypeScript(TS) and while the usage of TypeScript is encouraged, everything can be written using JS.
The main reasoning behind writing instrumentation tools using TypeScript would be the assistance of code auto-completion as well as modularity and compile-time errors. However, the latter will not prevent any runtime error that ends up wrongly manipulating an instrumented process.
It is also possible to use modules developed by other users like frida-panic (provides easy crash-reporting functions) and swift-frida (provides interop with Swift's data types). Loading external modules like the ones mentioned above is a feature exclusive to TypeScript development.
| TypeScript | JavaScript | |
|---|---|---|
| Editor autocompletion | Yes | No |
| Extension support | Yes | Yes, but limited |
| Error checking on build | Yes | No |
| Runtime error checking | Yes | Yes |
Although this process is seen in detail in Section 5.10, here is a small diagram displaying the main difference between developing an agent in TypeScript versus JavaScript:
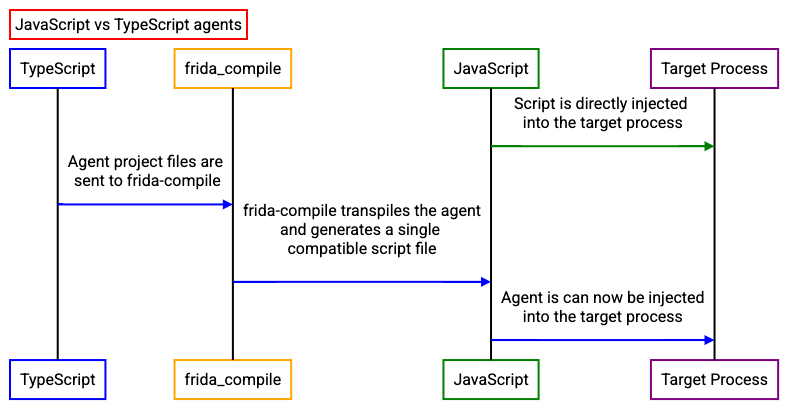
In essence, the TypeScript agent requires being transpiled to compatible JavaScript first.
As a general rule of thumb, if you are writing a simple and quick script you can stick with JavaScript for most of it. On the contrary, for bigger and more complex instrumentation scripts TypeScript is greatly recommended.
Throughout the book, the examples are written in JavaScript for the most part. The reasoning behind this is that it saves time(and space in the book) and scripts are easily usable/debuggable in Frida's command-line with no extra steps(transpiling the project into JavaScript).
An overview of Frida API
The Frida Javascript API has several modules that provide functionality to the users. These features are mostly cross-platform and thus work in almost every environment. There are however, exceptions to this rule such as the Java module which is only available in Android and the ObjC module that is only available as long as there is an Objective-C runtime present. Here the ones I consider the most important:
The Thread module provides functionality to operate with threads, sleeping them and obtaining backtraces.
The Process module provides information from the instrumented process, this covers obtaining the architecture, pointer sizes, code signing policies, thread IDs... But is also able to provide information about loaded modules, their addresses and enumerating memory ranges. It is also able to set a process-wide exception handler.
The Memory module provides functionality to operate with memory which translates into the ability of reading/writing strings from memory, numbers, pointers, structures... It also provides the ability to scan the process' memory for specific patterns and setting protection modes.
The Module module provides functionality to retrieve information from loaded modules. This is not only limited to retrieving information from them such as in-memory base addresses but is also able to load external modules.
The Kernel module provides access to kernel-mode APIs and allows to enumerate modules, memory ranges and change memory protection of specific memory regions. This feature is limited to MacOS systems.
CModule module allows to map a snippet of C source code in memory and make it available for the JavaScript runtime.This API is mostly used in the final steps of the instrumentation development in order to optimize the end result. This API is later seen in detail in Section ...
For code instrumentation, there are 4 modules:
- Interceptor provides the functionality to intercept function calls, modify behavior, function replacement... This API is one of the most important if not the most and is used through the book continuously.
- ObjC provides functionality to interact with Objective-C constructs, methods and classes.
- Stalker is a code tracing engine built-in Frida. This module will be seen in detail later in Section ...
- Java module provides instrumentation for JAVA APIs in the Android ecosystem. This module is not available to instrument JAVA applications in desktop operating systems.
A more detailed, API-by-API documentation can be found at the frida.re site along with some examples of their usage.
Main features
There are two main features that Frida provides us with, the first one is the Interceptor API and the second one is the Stalker code-tracing engine. In later sections such as Section 6.9 both the Interceptor API and the Stalker API are put in practice.
Stalker: a code tracing engine
Stalker is a code tracing engine, which allows transparently following of threads and tracing every instruction and function that are being called.
The Stalker engine works by applying a technique named dynamic recompilation. Dynamic recompilation is an emulation technique that translates into recompiling, while a program is running, the target program's machine code (instructions) into a local copy that is able to run in your target CPU. These instructions are kept in caches which can be read, written or executed on demand.
 Figure 5. Stalker's dynamic recompilation.
Thus, as seen in Figure 5. Stalker creates a copy of the instructions that are going to be executed and adds its modifications to the copy and it is this copy that is executed instead. The original instructions are left unmodified. This logic allows to maintain the original checksum while still being able to trace the execution. This technique was chosen due to it being very performant.
Dynamic recompilation is a rather complex technique mainly used in emulators and going in depth of how it works is out of the scope of this book (and takes some time to fully grasp) - But if you are interested in learning more in depth how this technique works by all means check Marcosatti's guide about the topic or Ole's post about the anatomy of a code tracer.
Hooks and the Interceptor API
API hooking is a technique which allows inspecting or modifying the flow of function calls. It is possible to achieve this through different techniques but the most common one are trampoline based hooks. These work by inserting code into the beginning of the function we want to instrument, which jumps to a function that is in our control, so that the newly created function is executed instead of the original one. Let's see a more graphical example of how this works:
Say there is a program that has a function_A function, and the intent is to execute the function_B function instead. function_A prologue is modified and replaced with a JMP instruction to our function_B. Once function_B code is executed, the trampoline ensures it returns to the intended function_A execution flow.

Note: This is a very brief explanation of what API hooking is and one of its techniques, for more information I recommend checking this post.
The Interceptor API allows us to easily hook functions or code sections provided a valid memory address. It takes NativePointers (a type defined by Frida in TypeScript) matching the target function address and lets us attach to some interesting callbacks:
onEnter: Allows us to see or modify what is being submitted to the function before its execution begins, this being function arguments before they are manipulated as well as other memory sections.onLeave: Allows us to see or modify return values or how function arguments were modified after the function execution. Same applies to memory regions.
Any hooks installed by the Interceptor API are automatically reverted after closing our tool or destroying our instrumentation script.
frida-tools
frida-tools is a Python package that offers some CLI tools that can be used for quick instrumentation and they can be installed by simply running the following pip:
$ pip install frida-tools
The frida-tools package includes a set of small tools although this book only covers the most important ones (frida-trace and Frida's command line interface), because those are the most used ones.
Frida command line interface
One of the two most important tools that are present in the frida-tools package is the Frida command line interface. Once installed, it can be accessed by typing frida in the system console be it bash, Windows' CMD or MacOS Terminal/iTerm.
Frida's CLI is a very important tool because it kind of substitutes the need for a control script (the one usually written with bindings like frida-python) and thus allows to quickly instrument a binary or perform quick tests without the need of writing a full-fledged instrumentation script.
Almost every example in this book can be run through Frida's CLI. Let's see how this can be achieved and what options the CLI brings to the table.
To instrument a process that is already running, this can be achieved by simply writing the PID(Process IDentifier) of the process or its name:
$ frida 1234
$ frida notepad.exe
However, in case there are two processes with the same name Frida will fail because it doesn't know which process to attach to. To solve this issue, try to use the PID as much as possible.
-f switch allows to spawn a process given a path. When doing this, the instrumented binary is spawned by Frida and the user is given access to a command line. Frida will immediately continue the execution of the application. In case early instrumentation is needed, your script should be loaded via -l or you can use the --pause argument to have Frida pause the thread until you enter the %resume command.
-l switch loads an instrumentation script. This is the most useful switch because it allows to directly load an instrumentation script in the process to be instrumented (without the user having to write any instrumentation tool). When using this feature, Frida will automatically detect changes to your script and inject the updated script into the targeted application.
--runtime allows choosing between the QuickJS runtime (--runtime=qjs) and the JavaScript V8 (--runtime=v8) one. A detailed explanation between the difference of these runtimes can be read on the following quote.
Frida runtimes
Frida supports running instrumentation scripts using duktape (an embedded JavaScript Engine), JavaScript V8 Engine and now in recent versions QuickJS (which replaces duktape). For basic scripts QuickJS is enough whereas V8 provides better language features as well as more detailed error logs. Also V8 is more performant than QuickJS but JS VM exits(this is, every time our code has to communicate with the agent) are more expensive than QuickJS.
Since they are both included when you install Frida you are free to choose whichever engine suits your use case; in case you are having trouble figuring out where exactly your instrumentation code is failing be sure to check the V8 engine because errors are more detailed (you can learn how to switch engines in Section 5.3. frida-trace).
After this brief explanation on Frida's runtimes, let's continue talking about Frida's CLI parameters.
By default Frida instruments in our local machine but also allows for:
-Ufor USB instrumentation of devices connected via USB (mainly smartphones). Requires a version synced frida-server running on the connected device.-Rfor remote instrumentation. Requires a version synced frida-server running in the remote host.-Hfor remote instrumentation specifying a host. For example it is possible to instrument a machine in our local network:frida -H 192.168.1.81-Dto instrument a device given an identifier.
Some other Frida CLI arguments worth mentioning:
--stdio=inherit|pipe allows inheriting the standard input/output of the instrumented application by default but this can be piped setting --stdio=pipe.
--pause will pause the application's thread and allow the user to add additional instrumentation or explore the application. The thread will resume when the user executes %resume.
-C allows loading a CModule. This is later discussed in detail in the CModule section. The same goes for the --toolchain switch.
-o logs output to a file.
-c allows loading an instrumentation script hosted in Frida's codeshare repository. If someone has already written a script that does what is needed for the task. It can be fetched from this repository automagically.
There are other command line switches present in the Frida CLI but they are either focused on mobile devices or self explanatory. Also note that some of these command line switches are shared with the frida-trace tool which is explained in the next section.
frida-trace
frida-trace is a tool that allows us to instrument processes or apps without the need of writing an instrumentation tool, this one is essentially based on Frida’s Interceptor API. Its main features are:
- Instrument live processes or spawn new processes.
- Following child processes (Note: This is implemented per system, which means that not all methods are included. E.g.: Windows only includes the CreateProcessInternalW as a reference for detecting child processes.)
- Instrument all the functions included in a module:
KERNEL32.DLL!*orNTDLL.DLL!* - Instrument specific APIs:
KERNEL32.DLL!CreateFileW - Works in a local environment, remote environment as well as USB for mobile devices.
This tool provides different command line arguments, here we will see how they work and how they are useful to us.
$ frida-trace -f binary.exe: The-fparameter translates into filepath and is used to spawn a new process given a path to a binary. This works for instrumenting processes before any app code has the opportunity to run (or bypass any anti-tampering measures).$ frida-trace <PID|process_name>: If no-fparam is specified, frida-trace automatically searches for any PID or process name matching the provided one.
It is also possible to choose the JavaScript runtime between JavaScript's V8 or QuickJS:
$ frida-trace --runtime=quickjs|v8 1234
One of the important details of Frida's CLI tools is that parameters are case sensitive in most cases, it is important to take this into consideration. An example is that lowercase parameters are used for functions and uppercase parameters for modules, be it inclusions or exclusions.
Functions or modules can be traced using frida-tools, functions are traced with the -i parameter whereas modules can be included with the -I parameter. For exclusions of functions and modules, there are -x and -X respectively.
-I and -X only affect module exports and not module imports, for module imports use the -T parameter.
It is possible to use the * wildcard for partial matches such as CreateFile*.
Before introducing some usage examples, say we have a binary with the following exports: KERNEL32.DLL!CreateFileA, KERNELBASE.DLL!CreateFileA, KERNEL32.DLL!CreateFileW, KERNELBASE.DLL!CreateFileW, KERNEL32.DLL!DeleteFileW and ADVAPI32.DLL:RegOpenKeyExW.
$ frida-trace -i "CreateFileW": Instruments every API call that matches the exact string, without taking into account which module it is coming from. When no exclusions are specified Frida will intercept all the matching functions. In this case, Frida would instrument bothKERNEL32andKERNELBASE'sCreateFileW.$ frida-trace -i "CreateFile*": Instruments all the APIs or functions that match the starting pattern ofCreateFile<…>. In this case, it would instrument bothKERNEL32andKERNELBASE'sCreateFileWandCreateFileA.$ frida-trace -i "CreateFileW" -I "KERNEL32.DLL": Instruments onlyKERNEL32.DLL!CreateFileW$ frida-trace -i "CreateFileW" -X "KERNEL32.DLL": Instruments anyCreateFileWout ofKERNEL32.DLL. In this case, Frida only instrumentsKERNELBASE'sCreateFileW.
These parameters can be repeatedly used to include or exclude multiple functions or modules. There is also the possibility of instrumenting function calls given module offsets thanks to the -a parameter. An example:
$ frida-trace <PID> -a "customLib.DLL!0x1234"
Other modifiers to remember and/or take into account:
-q: remove Frida’s API call formatting for each instrumenting call.--runtime: Choose the desired runtime. QuickJS is recommended for performance and V8 for modern JS features and a more in-depth error reporting.--debug: opens Frida’s debug console.
The following table shows summarizes the different command line switches of frida-trace:
| Options | Effect |
|---|---|
| -i | Include function |
| -x | Exclude function |
| -I | Include module |
| -X | Exclude module |
| -T | Include imports |
| -s | Include debug symbols |
--runtime |
Switch between QuickJS runtime and V8 |
| -f | Spawn from file |
Whenever we instrument a module or an API call or function, frida-trace auto-generates a handler with the basic structure for us to write the instrumentation code.
To see how this tool works in detail, we will make use of a practical example. In this case, the target process is notepad.exe, Windows’ signature plain text editor. This binary uses KERNEL32’s CreateFileW to create and/or open files therefore it is interesting to instrument it in order to see what it is trying to open.
The first thing that needs to be done is to open notepad.exe and let it run in the background. Then, run the following command from our terminal:
$ frida-trace -i "CreateFileW" notepad.exe
Note: Be sure to check that no other processes named notepad.exe are running in the background and be sure to use the PID notepad instance that you want to instrument. In Windows, you can get the PID with the tasklist command.
If successful, frida-trace generates the following output:
Instrumenting functions...
CreateFileW: Auto-generated handler at "/Users/fernandou/__handlers__/KERNEL32.DLL/CreateFileW.js"
CreateFileW: Auto-generated handler at "/Users/fernandou/__handlers__/KERNELBASE.dll/CreateFileW.js"
Started tracing 2 functions. Press Ctrl+C to stop.
The result is that these KERNELBASE.DLL and KERNEL32.DLL’s CreateFileW have been instrumented, and a default auto-generated stub is (one per function per module). Its contents are:
/*
 * Auto-generated by Frida. Please modify to match the signature of CreateFileW.
 * This stub is currently auto-generated from manpages when available.
 *
 * For full API reference, see: http://www.frida.re/docs/javascript-api/
 */

{
  /**
   * Called synchronously when about to call CreateFileW.
   *
   * @this {object} - Object allowing you to store state for use in onLeave.
   * @param {function} log - Call this function with a string to be presented to the user.
   * @param {array} args - Function arguments represented as an array of NativePointer objects.
   * For example use args[0].readUtf8String() if the first argument is a pointer to a C string encoded as UTF-8.
   * It is also possible to modify arguments by assigning a NativePointer object to an element of this array.
   * @param {object} state - Object allowing you to keep state across function calls.
   * Only one JavaScript function will execute at a time, so do not worry about race-conditions.
   * However, do not use this to store function arguments across onEnter/onLeave, but instead
   * use "this" which is an object for keeping state local to an invocation.
   */
  onEnter: function (log, args, state) {
    log('CreateFileW()');
  },

  /**
   * Called synchronously when about to return from CreateFileW.
   *
   * See onEnter for details.
   *
   * @this {object} - Object allowing you to access state stored in onEnter.
   * @param {function} log - Call this function with a string to be presented to the user.
   * @param {NativePointer} retval - Return value represented as a NativePointer object.
   * @param {object} state - Object allowing you to keep state across function calls.
   */
  onLeave: function (log, retval, state) {
  }
}
Now there is something that catches our attention, why are two stubs generated? CreateFileW is present in KERNELBASE.DLL and it stores a reference to KERNEL32’s CreateFile and, since it was not specified which module we want to instrument frida-trace instruments both by default. The next problem is to extract meaningful information from this API call and for this purpose we can examine the official Microsoft MSDN documentation:
HANDLE CreateFileW(
  LPCWSTR               lpFileName,
  DWORD                 dwDesiredAccess,
  DWORD                 dwShareMode,
  LPSECURITY_ATTRIBUTES lpSecurityAttributes,
  DWORD                 dwCreationDisposition,
  DWORD                 dwFlagsAndAttributes,
  HANDLE                hTemplateFile
);
In this case, CreateFileW’s most important parameter is its first one lpFileName which stores a wide string (UTF-16) pointing to the file it wants to open. CreateFileW (W for wide Unicode string) is a C string encoded as UTF-16 (UTF-16 is Windows only). Therefore, the handler can be completed by writing in the onEnter code section of the generated stub:
  onEnter: function (log, args, state) {
    log('CreateFileW('+ args[0].readUtf16String() + ')');
  },
An important note is that there are 3 parameters in the onEnter function, these being log, args, state. log is a callable function that is short for console.log. args are the array list of arguments that the instrumented function receives, this array is of unknown size so the number of arguments must be figured out beforehand. state is used to share state between onEnter and onLeave functions (sharing information before the function execution and after execution, on return).
In this case the auto-generated log call is extended by adding args[0].readUtf16String() which stands for obtaining the first argument from the parameter array and reading it as an UTF-16 encoded string.
Finally we get the following output:
           /* TID 0x325c */
  5877 ms  CreateFileW()
  5877 ms  CreateFileW(C:\Users\fdiaz\Documents)
  5877 ms  CreateFileW()
  5878 ms  CreateFileW(C:\Users\fdiaz\Documents\test.dat)
  5879 ms  CreateFileW()
Note: We have duplicates of CreateFileW due to KERNELBASE’s stub.
Note 2: TID(Thread ID) and timestamps will differ when you run frida-trace in your environment but this does not affect the final output at all.
After instrumenting the notepad.exe it can be observed that the process is trying to create a file in the user document’s folder and that this file name is test.dat.
The Frida API documentation can be seen in the official website however it does not have as many examples as one would desire. For the most popular use cases there are some examples written, but we will play with the Frida repl (Frida's command line) to learn about this API.
Note: All the instrumentation code examples found in this text use the appropriate scope modifier for variables according to the situation (const, let...). However, when using the Frida REPL (this being the Frida command line) remember to remove these modifiers. The reasoning behind this is that Frida's REPL uses eval() to handle commands and thus these scope modifiers are scoped to the current block.
If you are using a script then there is nothing to worry about. :)
Dealing with data types with Frida
Dealing with strings: Reading and allocation
It is possible to work with strings be it reading strings from memory or allocating them. This section covers the basic use cases and some platform specific ones.
For allocating strings we have the following APIs:
| API | Description |
|---|---|
Memory.allocAnsiString |
Allocating ANSI strings (windows-only) |
Memory.allocUtf8String |
Allocating UTF8 strings |
Memory.allocUtf16String |
Allocating UTF16 strings (windows-only) |
When you allocate strings always make them constant to avoid any problems with the string being wiped from memory at some point (this might happen because of several reasons, mainly the program freeing memory regions):
const myTestString = Memory.allocAnsiString("HELLO WORLD");
myTestString can be read using the string read APIs:
| API | Description |
|---|---|
{NativePointer}.readCString |
Read C-Style strings |
{NativePointer}.readAnsiString |
Read ANSI strings |
{NativePointer}.readUtf8String |
Read UTF8 strings |
{NativePointer}.readUtf16String |
Read UTF16 strings |
Note: {NativePointer} is a pointer to an address containing the string.
Note 2: It is possible to pass a number as an argument to these APIs to specify the number of bytes to read.
myTestString can be read using the Memory.readAnsiString() API:
myTestString.readAnsiString();
In case it was a C-String and this string is 1024 bytes long it is possible to pass the size of the string as an argument:
myTestString.readCString(1024);
Frida figures out in most cases where the string ends for each string type however, when you are sure of the size of the string by all means share it with Frida! :).
Practical use case: Reading a WinAPI UTF16 string parameter
This example is a use case of a user from the Frida IRC / Telegram channel who requested assistance, so I ended up doing a quick POC for it. In this case, he wanted to hook SearchPathW to get the lpFileName argument; this API is part of KERNEL32.DLL or KERNELBASE.DLL
  DWORD SearchPathW(
  LPCWSTR lpPath,
  LPCWSTR lpFileName,
  LPCWSTR lpExtension,
  DWORD   nBufferLength,
  LPWSTR  lpBuffer,
  LPWSTR  *lpFilePart
);
First let’s take a look at the SearchPathW parameters, in this case the second argument matches lpFileName and its type is LPCWSTR which means a pointer to a wide string or UTF-16 in case of Windows.
I made an example program to test it out, you can compile it under Windows using Visual Studio:
#include <iostream>
#include <Windows.h>

int main()
{
    TCHAR lpBuffer[MAX_PATH];
    LPWSTR *lpFilePart{};
    DWORD result;

    result = SearchPath(NULL, L"c:\\windows\\", NULL, MAX_PATH, lpBuffer, lpFilePart);
    std::cout << "SearchPath retval: " << result << std::endl;
}
This program can be further modified to test more things if you are interested but for this basic example we will just check if c:/windows folder path exists.
It is possible to instrument this application from Frida's REPL(command line interface) but first let's write an instrumentation script. As mentioned in Section 4.3 JavaScript vs TypeScript, it is possible to write instrumentation scripts in JavaScript and TypeScript. For the time being instrumentation is written in JavaScript but the same code equivalent in TypeScript is shown(refer to Section 5.10. Writing our first agent for building the agent with TypeScript).
First, let's create a file named instrumentation.js. From there, we need:
- Get a pointer to the function
SearchPathWfromKERNEL32.DLLand intercept it. - Read the first argument(from the array, this is 0)
- Print it into the console.
const searchPathPtr = Module.getExportByName("KERNELBASE.DLL", "SearchPathW");

Interceptor.attach(searchPathPtr, {
    onEnter(args) {
        console.log("Output: " + args[0].readUtf16String())
    }
});
Then, we can launch the C++ app we created before with the instrumentation code:
frida -l instrumentation.js -f searchPathCpp.exe
Note: The -l flag sets the instrumentation script.
And then our console prints:
Output: c:\\windows\\
For learning purposes, this is the equivalent code in case we would write our instrumentation script in TypeScript:
const searchPathPtr:NativePointer = Module.getExportByName("KERNELBASE.DLL", "SearchPathW");

class SearchPathW {
  onEnter(args:NativePointer[]) {
    console.log("Output: " + args[0].readUtf16String());
  }
}

Interceptor.attach(searchPathPtr, new SearchPathW);
As you can see, the code is a bit longer (due to types mostly) but also looks cleaner and clearer. The main difference is that instead of directly writing Interceptor.attach it is wrapped in a class which overloads the onEnter callback.
Numbers
It is possible to operate with numbers in a similar fashion as with strings, but there are some caveats to take into account. The first and most important one is that we need to know whether the argument is just a number type or an address to it, because if it is not an address in memory then we cannot use Frida's API for numerical types and if we do we are going to screw up the target process. Now we are going to see how to read and write these values whether they are passed by value or by reference.
Numerical arguments passed by value
In case that the arguments are simple integers like in the following stub:
int
add(int a, int b)
{
  return a + b;
}
If we write:
Interceptor.attach(addPtr, {
  onEnter(args) {
    console.log("a: " + args[0].toInt32());
    console.log("b: " + args[1].toInt32());
  }
});
Then if we try to read these numbers, args[0] and args[1] will point to a hex representation of the arguments and we can simply call toInt32() to get the real input.
Numerical values by reference
In this case we will always be working with an address that points to the object we want to read, and because of this we will need to take a glimpse of which APIs we have available:
| API | Description |
|---|---|
| {}.readInt() | Read an Integer from the given address |
| {}.readUInt() | Read an unsigned Integer from the given address |
| {}.readS8 | Read a signed 8-16-32-64 bit integer from the given address |
| {}.readShort() | Read a short integer from the given address |
| {}.readFloat | Read a float number from the given address. |
| {}.readDouble | Read a double number from the given address |
| {}.readLong() | Read a long number from the given address |
| {}.readULong() | Read an unsigned long number from the given address. |
| {}.readUShort() | Read an unsigned short number from the given address. |
| {}.readUS8() | Read an unsigned integer from the given address. |
Where {} equals a NativePointer or ptr().
For this example we will use the same function as before which will instead print two values to screen:
// Given a = 1337, b=7331
void
print_numbers(int *a, int *b)
{
  printf("a:%d\nb:%d\n", *a, *b);
}
If we try to read args[0] and args[1] in this case, we will only get a random address that is not understandable for us, but we can use the hexdump API to see its contents:
7ffecdce5c08 a3 1c 00 00 39 05 00 00 c0 91 d0 b3 49 56 00 00 ....9.......IV..
(Due to the writing format limitations, hexdump output is limited.)
We can see the pairs 1C A3 which fit decimal 7331, so there is our number but... how do we read it? We can call the aforementioned API readInt()
Interceptor.attach(addPtr, {
    onEnter(args) {
        console.log("a: " + args[0].readInt());
        console.log("b: " + args[1].readInt());
  }
});
Which will print out the a=1337 and b=7331 values.
Writing numbers
It is also possible to write our desired values to an address provided we fit the appropriate struct and call the right API.
| API | Description |
|---|---|
| {}.writeInt() | Write an Integer to the given address |
| {}.writeUInt() | Write an unsigned Integer to the given address |
| {}.writeS8 | Write a signed 8-16-32-64 bit integer to the given address |
| {}.writeShort() | Write a short integer to the given address |
| {}.writeFloat | Write a float number to the given address. |
| {}.writeDouble | Write a double number to the given address |
| {}.writeLong() | Write a long number to the given address |
| {}.writeULong() | Write an unsigned long number to the given address. |
| {}.writeUShort() | Write an unsigned short number to the given address. |
| {}.writeUS8() | Write an unsigned integer to the given address. |
Using as a basis the C example we have just seen before, we will now try to change its values to 10 and 20.
Interceptor.attach(addPtr, {
    onEnter(args) {
        args[0].writeInt(10);
        args[1].writeInt(20);
  }
});
Note: This only works if the args we are receiving are pointing to an address containing the data structure we want, it doesn't not work for numbers passed by value. If you want to see how to modify these values check Section 6.7 Modifying values before execution.
The output will be modified on our target program and as a result prints a=10 and b=20 instead.
In the next section we will see how to deal with pointers.
Pointers
It is possible to read the address that a pointer is pointing to by using the readPointer() API. This use case is going to be useful when there is a pointer to a struct to be read. But a more in depth use case is covered later in Section 7.4.
The following example shows a use case where the readPointer API returns useful information. The recvfrom function takes the socklen_t argument as it is documented in the man pages:
ssize_t recvfrom(int sockfd, void *buf, size_t len, int flags,
                 struct sockaddr *src_addr, socklen_t *addrlen);
The man pages state:
socklen_t, which is an unsigned opaque integral type of length of at least 32 bits
Since there is a pointer to it in the 6th parameter, it can be retrieved using readPointer:
// ...
    onEnter(args) {
        console.log(
            args[5].readPointer();
        );
    }
// ...
If you are interested in understanding how Frida is able to interact with pointers from JS, please read the following quote:
About NativePointers
Frida is able to interact with pointers thanks to the NativePointers objects that are present in Frida. The reason why the NativePointer data type exists is because the JS number type is backed by double, so it is not able to represent all 64-bit pointers therefore whenever pointers are used in Frida they are always backed by this data type.
It is also possible to work with pointers to offsets, these are introduced in the next sub-section.
Pointer to offsets
In case offsets are obtained through reverse engineering or online offset tables it is possible to use them in Frida. In order to do so, the first requirement is getting the base address of the module of which the offset belongs too:
myBaseAddr = Module.findBaseAddress('myLib.so');
findBaseAddress returns the base address of the module, which can now be used to apply offsets:
myOffsetPtr = myBaseAddr.add(ptr('0x76E'))
And now this myOffsetPtr pointer can be used in our instrumentation code in conjunction with other APIs like Interceptor.attach as seen in Section 5.4.1.
Finding the modules of a process
In the previous example myLib.so was used to get the base address but what if the module name is not known to us or is named differently from what was expected?
For this scenario, the best option would be calling the Process.enumerateModulesSync() API that returns a list of modules along their base addresses, sizes and paths.
For an example of this API, check Section 4.9
Getting pointers to exports
It is possible to use Interceptor.attach with process's exports and imports, however in case we want to do that we need an address pointing to the export.
To retrieve this pointer we need to know the module name and the name of the export however, if we pass null to the module argument Frida will try return the first match of the export name. To get the export's address we have the Module.findExportByName API.
Syntax:
Module.findExportByName([MODULE_NAME], [EXPORT_NAME])
This API returns a pointer in case a valid export is found and null in case nothing matches.
findExportByName vs getExportByName
It is important to notice (especially if we are using autocomplete) that there are two methods which seem to be similar: Module.getExportByName and Module.findExportByName. The main difference resides in what will happen if an export is not found.
.getExportByNamewill throw an exception in case the export is not found.findExportByNamewill simply returnnull
I recommend using .getExportByName to be able to spot errors but if you want to use .findExportByName be sure to check the return values.
Pointer to ArrayBuffers
When allocating strings what is noticeable is the fact that it returns a pointer and this pointer can already be used to substitute other strings in the code:
[Local::]-> Memory.allocUtf8String('foo')
"0x7f81143f6be0"
This same situation applies to pointers to numerical types where what is needed is to call the respective .read/.write(.readU32()/.writeU32()) APIs. However this is not the case for ArrayBuffer's that don't return an address as it can be seen in this example:
[Local::]-> test = new ArrayBuffer(10)
0000  00 00 00 00 00 00 00 00 00 00                     ..........
In this case the datatype has access to the .unwrap() method which returns a pointer that points to the first element of the ArrayBuffer:
[Local::]-> test.unwrap()
"0x7fc17c210930"
{blurb, class: information, icon: info-circle}
Size of pointers
The size of pointers is something that must be taken into account when performing more complex operations and to ensure that an instrumentation script is portable enough.
The API Process.pointerSize returns the size of a pointer in bytes of the process that is being instrumented. This will be needed in later sections like Section 6.3 and Section 6.4
Hexdump: getting a picture from a memory region
The hexdump function returns a hexdump given a NativePointer or an ArrayBuffer. This is useful when we want to observe a given address or get a better representation of an ArrayBuffer.
Syntax:
hexdump(address, [, options])
Where options can be:
{
    offset: number,
    length: number,
    header: true|false,
    ansi: true|false,
}
Note: To get a better representation, use console.log for pretty printing.
For this quick example, write a simple "hello world" program, compile it and fire it up in Frida. Once we are in it, we will call Process.enumerateModules() and get the one matching our binary:
$ clang hello.c
$ frida -f a.out

[Local::a.out]-> Process.enumerateModulesSync()
[
    {
        "base": "0x1072f1000",
        "name": "a.out",
        "path": "/Users/fernandou/Desktop/a.out",
        "size": 16384
    },
    ...
]
Then we get the base address of our binary, which we can now print using Frida:
$ clang hello.c
$ frida -f a.out --pause
     ____
    / _  |   Frida 16.0.8 - A world-class dynamic instrumentation toolkit
   | (_| |
    > _  |   Commands:
   /_/ |_|       help      -> Displays the help system
   . . . .       object?   -> Display information about 'object'
   . . . .       exit/quit -> Exit
   . . . .
   . . . .   More info at https://frida.re/docs/home/
   . . . .
   . . . .   Connected to Local System (id=local)
Spawned `a.out`. Use %resume to let the main thread start executing!
[Local::a.out ]-> Process.enumerateModulesSync()
[
  {
    "base": "0x559b2f496000",
    "name": "a.out",
    "path": "/home/kali/tmp/a.out",
    "size": 20480
  },
  ...
]
[Local::a.out ]-> console.log(hexdump(ptr(0x559b2f496000)))
               0  1  2  3  4  5  6  7  8  9  A  B  C  D  E  F  0123456789ABCDEF
559b2f496000  7f 45 4c 46 02 01 01 00 00 00 00 00 00 00 00 00  .ELF............
559b2f496010  03 00 3e 00 01 00 00 00 50 10 00 00 00 00 00 00  ..>.....P.......
559b2f496020  40 00 00 00 00 00 00 00 98 36 00 00 00 00 00 00  @........6......
559b2f496030  00 00 00 00 40 00 38 00 0d 00 40 00 1f 00 1e 00  ....@.8...@.....
559b2f496040  06 00 00 00 04 00 00 00 40 00 00 00 00 00 00 00  ........@.......
559b2f496050  40 00 00 00 00 00 00 00 40 00 00 00 00 00 00 00  @.......@.......
559b2f496060  d8 02 00 00 00 00 00 00 d8 02 00 00 00 00 00 00  ................
559b2f496070  08 00 00 00 00 00 00 00 03 00 00 00 04 00 00 00  ................
559b2f496080  18 03 00 00 00 00 00 00 18 03 00 00 00 00 00 00  ................
559b2f496090  18 03 00 00 00 00 00 00 1c 00 00 00 00 00 00 00  ................
559b2f4960a0  1c 00 00 00 00 00 00 00 01 00 00 00 00 00 00 00  ................
559b2f4960b0  01 00 00 00 04 00 00 00 00 00 00 00 00 00 00 00  ................
559b2f4960c0  00 00 00 00 00 00 00 00 00 00 00 00 00 00 00 00  ................
559b2f4960d0  18 06 00 00 00 00 00 00 18 06 00 00 00 00 00 00  ................
559b2f4960e0  00 10 00 00 00 00 00 00 01 00 00 00 05 00 00 00  ................
559b2f4960f0  00 10 00 00 00 00 00 00 00 10 00 00 00 00 00 00  ................
You are free to use custom options in case you want to start at a different offset or need longer lengths.
Info
The hexdump API displays data byte-by-byte and only shows printable ASCII characters. Do not use the output of this API as a reference for calling Memory APIs such as readUtf8String.
Writing our first agent
Until now the examples we have seen can be followed with a binary of our choice and Frida's REPL however, it is interesting to see how to write a full-fledged instrumentation tool (with our agent and the control script.).
Thankfully, in most recent versions of Frida the agent boilerplate can be generated with frida-create, a CLI tool that creates a boilerplate agent for us to fill:
$ frida-create agent
Which is the same as:
$ git clone git://github.com/oleavr/frida-agent-example.git
Beware that frida-create will create the agent in the current working directory. The output we should be getting should be this:
$ frida-create agent
Created ./package.json
Created ./tsconfig.json
Created ./agent/index.ts
Created ./agent/logger.ts
Created ./.gitignore

Run `npm install` to bootstrap, then:
- Keep one terminal running: npm run watch
- Inject agent using the REPL: frida Calculator -l _agent.js
- Edit agent/*.ts – REPL will live-reload on save

Tip: Use an editor like Visual Studio Code for code completion, inline docs,
     instant type-checking feedback, refactoring tools, etc.

$ ls -l
total 16
drwxr-xr-x  4 fernandou  primarygroup  128 14 Feb 15:46 agent/
-rw-r--r--  1 fernandou  primarygroup  449 14 Feb 15:46 package.json
-rw-r--r--  1 fernandou  primarygroup  167 14 Feb 15:46 tsconfig.json
The first time we create the agent we need to run npm install to bootstrap. Then, when we want to build our agent we will run:
$ npm run build
And it will create a file _agent.js with the instrumentation script for us to use. It is also possible to run npm run watch to get live-reload when a file is saved.
When we are finished with our control script, we have two options:
- Write a control script to manage messages and inject our agent.
- Use Frida's REPL
frida -l _agent.js notepad.exeto inject the agent.
Although we can use REPL for quick tests, we will go the long way now by writing a control script.
Writing the control script
import os
import sys

import frida

_SCRIPT_FILENAME = 'agent.js'

def on_message(message, date):
    """Print received messages."""
    print(message)

def main(process_name):
    with open(_SCRIPT_FILENAME, 'r') as script_file:
        code = script_file.read()

    device = frida.get_local_device()
    pid = device.spawn(process_name)
    print('pid: %d' % pid)

    session = device.attach(pid)

    script = session.create_script(code)
    script.on('message', on_message)
    script.load()

    device.resume(pid)

    print('Press CTRL-Z to stop execution.')
    sys.stdin.read()
    session.detach()

if __name__ == '__main__':
    main(sys.argv[1])
This is the core instrumentation script that we are going to be using for our examples. You are free to work directly with Frida's REPL but if you want to automate things our want more control over what is happening then be sure to use this script. After some reading, we will see how to extend this script to enable child-gating which translates into handling child processes automagically.
Let's explain the most important parts of this script:
def on_message(message, data):
    """Print received messages."""
    print(message)
The on_message callback will receive the messages from the agent, we will print them and avoid handling them for now.
device = frida.get_local_device()
pid = device.spawn(process_name)
print('pid: %d' % pid)
frida.get_local_device() get's the local device (in this case, our desktop OS) and once we get the device object we can call the spawn(PID|ProcessName) API. If successful, this returns a pid (int) we can use and process remains suspended.
session = device.attach(pid)

script = session.create_script(code)
script.on('message', on_message)
script.load()

device.resume(pid)
We then create a session object with the attach(pid) API which allows us to interact with the process. This session enables the .create_script(str) method to send our instrumentation script (which we have opened and read before, or we can just hardcode it.) and returns the script object.
Once we have the script object, we can assign how each callback will be handled (for now, just the message one) with .on(event, callback) - When we are finished assigning callbacks we can load the instrumentation script.
When we have finished with everything, we can call device.resume(pid) to resume the process and instrumentation will begin. When we are done, we can call session.detach to detach from the instrumented process and revert any instrumentation (hooks will be reverted).
This instrumentation script is fairly simple and might not seem useful at first, but once we learn about the child-gating feature and RPC exports we will see how this script can be extended and become more useful.
For now, you can extend this script to log messages to a file instead of printing them to the console.
Note: When you send lots of send() events from JS the on_message callback will be overloaded slowing things down. Be sure to batch messages to reduce overhead before sending them.
Injecting our scripts using Frida's command line
Although most of the examples of the book can be done in Frida's REPL (this is, writing each statement separately) its better and I encourage you to write everything in an instrumentation script so that it's easier to debug and read. There are also some limitations on Frida's REPL such as not being able to use let and const keywords, be careful!
To inject instrumentation scripts we use the -l parameter:
$ frida -l myscript.js <PID|process name>
Alternatively, we can spawn a process from scratch:
$ frida -l myscript.js -f <filepath>
Remote instrumentation
There are situations when we want to instrument applications remotely such as instrumenting malware (so that our development environment is safe) or whenever physical development is not an option (a mainframe, a remote server, mobile devices...).
Fortunately, Frida provides pre-built binaries for the server-side. These binaries can be found under the releases and are tagged as frida-server (for example frida-server-16.0.11-windows-x86_64.exe.xz).
To remotely instrument an application with Frida we need:
- A remote system running
frida-server - A binary that is able to run under the remote system mentioned in point 1.
- A local (this being our physical machine) installation of Frida (
frida-toolsandfridapackages). - frida-server and our physical installation of Frida must match versions.
First, let's set up the remote server. What is needed is only the frida-server binary so it can be downloaded from the aforementioned github releases page:
$ wget https://github.com/frida/frida/releases/download/16.0.11/frida-server-16.0.11-linux-x86_64.xz
Then extract it and give it execution permissions:
$ unxz frida-server-16.0.11-linux-x86_64.xz
$ file frida-server-16.0.11-linux-x86_64
$ chmod +x frida-server-16.0.11-linux-x86_64
And then start listening:
$ ./frida-server-16.0.11-linux-x86_64 -l 0.0.0.0
Now that the server-side part is covered, we can finally get to the the client part(our local computer).
The -H flag in frida and frida-trace allows us to connect to an specific address/port combination:
$ frida -H IP:PORT
or
$ frida-trace -H IP:PORT
In the following example, we open the /bin/ls binary on the remote server and try to obtain the Process.pointerSize of it:
frida -H 192.168.1.101 -f /bin/ls
-f spawns a binary from the remote filesystem and -H sets the IP address with no port so it uses the default one. And the final result is:
$ frida -H 192.168.1.101 -f /bin/ls --pause
     ____
    / _  |   Frida 16.0.11 - A world-class dynamic instrumentation toolkit
   | (_| |
    > _  |   Commands:
   /_/ |_|       help      -> Displays the help system
   . . . .       object?   -> Display information about 'object'
   . . . .       exit/quit -> Exit
   . . . .
   . . . .   More info at https://frida.re/docs/home/
   . . . .
   . . . .   Connected to 192.168.1.101(id=socket@192.168.1.101)
Spawned `/bin/ls`. Use %resume to let the main thread start executing!
[Remote::ls ]-> Process.pointerSize
8
Frida CodeShare repository
The Frida community has a codeshare repository where Frida instrumentation scripts are shared. There are multiple scripts that provide some interesting functionality such as tracing JNI APIs in Android or an ObjC method observer script. What is interesting about this repository is that the Frida command line is able to fetch and load scripts remotely. For example say we want to dump an iOS application using @Lichao890427's script, it would be possible by writing the following command:
$ frida --codeshare lichao890427/dump-ios -f YOUR_BINARY
Use these scripts wisely and avoid reinventing the wheel as much as possible, there is always room for improvement though.
Frida's CodeShare repository can be found at https://codeshare.frida.re/
Freeing allocated memory
When calling the Memory.alloc API one might wonder what to do with that allocated memory after it has achieved its effective task. In this case, the best idea is to reassign the value of the variable holding the memory address of the allocated memory and thus allowing Frida to free it. An example of this behavior:
[Android Emulator 5554::PID::1691 ]-> t = Memory.alloc(32);
"0x7cbe43acd0"
[Android Emulator 5554::PID::1691 ]-> t.writeUtf8String('frida frida rockssssssss')
"0x7cbe43acd0"
[Android Emulator 5554::PID::1691 ]-> console.log(hexdump(t))
             0  1  2  3  4  5  6  7  8  9  A  B  C  D  E  F  0123456789ABCDEF
7cbe43acd0  66 72 69 64 61 20 66 72 69 64 61 20 72 6f 63 6b  frida frida rock
7cbe43ace0  73 73 73 73 73 73 73 73 00 00 00 00 00 00 00 00  ssssssss........
7cbe43acf0  30 00 00 00 00 00 00 00 53 00 00 00 00 00 00 00  0.......S.......
7cbe43ad00  01 00 00 00 00 11 0d 00 e8 72 43 be 7c 00 00 00  .........rC.|...
7cbe43ad10  68 af 43 be 7c 00 00 00 00 ca 47 be 7c 00 00 00  h.C.|.....G.|...
7cbe43ad20  90 ac 43 be 7c 00 00 00 00 00 00 00 00 00 00 00  ..C.|...........
7cbe43ad30  30 bc 48 be 7c 00 00 00 d0 fd 87 06 7a 00 00 00  0.H.|.......z...
7cbe43ad40  00 00 00 00 00 00 00 00 33 00 00 00 00 00 00 00  ........3.......
7cbe43ad50  00 00 00 00 00 00 00 00 00 00 00 00 00 00 00 00  ................
7cbe43ad60  f0 f5 4b be 7c 00 00 00 f9 ff ff ff ff ff ff ff  ..K.|...........
7cbe43ad70  30 00 00 00 00 00 00 00 43 00 00 00 00 00 00 00  0.......C.......
7cbe43ad80  02 00 00 00 03 01 00 00 68 af 43 be 7c 00 00 00  ........h.C.|...
7cbe43ad90  88 fd 87 06 7a 00 00 00 a0 ad 43 be 7c 00 00 00  ....z.....C.|...
7cbe43ada0  e0 72 43 be 7c 00 00 00 ff ff ff ff ff ff ff ff  .rC.|...........
7cbe43adb0  00 00 00 00 00 00 00 00 53 00 00 00 00 00 00 00  ........S.......
7cbe43adc0  01 00 00 00 00 11 0d 00 88 fd 87 06 7a 00 00 00  ............z...
As it can be observed, the memory region of size 32 bytes is now filled with our UTF-8 string. Now, when t=null the memory region is as follows:
[Android Emulator 5554::PID::1691 ]-> t = null
[Android Emulator 5554::PID::1691 ]-> console.log(hexdump(ptr(0x7cbe43acd0)))
             0  1  2  3  4  5  6  7  8  9  A  B  C  D  E  F  0123456789ABCDEF
7cbe43acd0  00 00 00 00 00 00 00 00 00 00 00 00 00 00 00 00  ................
7cbe43ace0  50 48 bc ba 7c 00 00 00 f9 ff ff ff ff ff ff ff  PH..|...........
7cbe43acf0  30 00 00 00 00 00 00 00 53 00 00 00 00 00 00 00  0.......S.......
7cbe43ad00  01 00 00 00 00 11 0d 00 e8 72 43 be 7c 00 00 00  .........rC.|...
7cbe43ad10  68 af 43 be 7c 00 00 00 00 ca 47 be 7c 00 00 00  h.C.|.....G.|...
7cbe43ad20  90 ac 43 be 7c 00 00 00 00 00 00 00 00 00 00 00  ..C.|...........
7cbe43ad30  30 bc 48 be 7c 00 00 00 d0 fd 87 06 7a 00 00 00  0.H.|.......z...
7cbe43ad40  00 00 00 00 00 00 00 00 33 00 00 00 00 00 00 00  ........3.......
7cbe43ad50  00 00 00 00 00 00 00 00 00 00 00 00 00 00 00 00  ................
7cbe43ad60  f0 f5 4b be 7c 00 00 00 f9 ff ff ff ff ff ff ff  ..K.|...........
7cbe43ad70  30 00 00 00 00 00 00 00 43 00 00 00 00 00 00 00  0.......C.......
7cbe43ad80  02 00 00 00 03 01 00 00 68 af 43 be 7c 00 00 00  ........h.C.|...
7cbe43ad90  88 fd 87 06 7a 00 00 00 a0 ad 43 be 7c 00 00 00  ....z.....C.|...
7cbe43ada0  e0 72 43 be 7c 00 00 00 ff ff ff ff ff ff ff ff  .rC.|...........
7cbe43adb0  00 00 00 00 00 00 00 00 53 00 00 00 00 00 00 00  ........S.......
7cbe43adc0  01 00 00 00 00 11 0d 00 88 fd 87 06 7a 00 00 00  ............z...