MacOS
Although I am not yet very familiar with MacOS and Swift, I thought it was interesting to write about using Frida with MacOS (and this translates into knowledge for iOS) with some example applications.
It is important to take into account that working with MacOS and iOS apps is a slightly different from what is seen in previous sections due to Objective-C's runtime.
ObjC
The ObjC object allows us to access a variety of useful information:
-
ObjC.availabletells us if there is an ObjC runtime loaded, be sure to check that it is indeed available before using any other property or method ofObjC.*. -
ObjC.classesis an object that maps classnames toObjC.Objectbindings:
ObjC.classes.NSString.stringWithString
Which we can use: ObjC.classes.NSTring.stringWithString_("foobar");
It is also possible to list all methods loaded by a class by calling ObjC.classes.NSString.$ownMethods. Here is an example output limited to the first 10 results (due to format restrictions):
ObjC.classes.NSString.$ownMethods.slice(0, 10)
[
    "+ NSStringFromLSInstallPhase:",
    "+ NSStringFromLSInstallState:",
    "+ NSStringFromLSInstallType:",
    "+ stringWithUTF8String:",
    "+ stringWithFormat:",
    "+ string",
    "+ allocWithZone:",
    "+ initialize",
    "+ supportsSecureCoding",
    "+ stringWithCharacters:length:"
]
$ownMethods is limited to the object's class. In case you want to include the parent class's results you can use $methods instead.
We can obtain the moduleName of a class using $moduleName:
[Local::objCLI]-> ObjC.classes.NSString.$moduleName
"/System/Library/Frameworks/Foundation.framework/Versions/C/Foundation"
Intercepting NSURL InitWithString
We will now begin to learn how to instrument MacOS apps with a simple use case, a swift program that simply queries stackoverflow.com:
let url = URL(string: "http://www.stackoverflow.com")!
print(url);
let task = URLSession.shared.dataTask(with: url) {(data, response, error) in

    if error != nil || data == nil {
        print("Client error!")
        return
    }
    guard let response = response as? HTTPURLResponse, (200...299).contains(response.statusCode) else {
        print("Server error!")
        return
    }
    print("The Response is : ",response)
    print(data);
}

task.resume()

Our first option here is using frida-trace to see which NSURL* classes and methods are being called, the syntax for this however is different from what we have seen until now.
frida-trace -f swiftApp -m "-[NSURL **]"
Which will in turn create a .js file for each handler it has detected and print us something like this:
Started tracing 1987 functions. Press Ctrl+C to stop.
  /* TID 0x407 */
  1007 ms  -[NSURL initWithString:0x7fa35550bb40]
  1008 ms     | -[NSURL initWithString:0x7fa35550bb40 relativeToURL:0x0]
  1008 ms  -[NSURL isFileReferenceURL]
  1008 ms     | -[NSURL _cfurl]
  1008 ms  -[NSURL retain]
  1009 ms  -[NSURL retain]
  1009 ms  -[NSURL retain]
  1009 ms  -[NSURL release]
  1009 ms  -[NSURL retain]
  1009 ms  -[NSURL release]
  1009 ms  -[NSURL retain]
  1010 ms  -[NSURL release]
  1010 ms  -[NSURL retain]
  1010 ms  -[NSURL description]
  1010 ms     | -[NSURL scheme]
  1010 ms     |    | -[NSURL _cfurl]
  1010 ms     | -[NSURL baseURL]
  1010 ms     |    | -[NSURL _cfurl]
  1010 ms     | -[NSURL relativeString]
  1010 ms     |    | -[NSURL _cfurl]
  1010 ms  -[NSURL release]
  1010 ms  -[NSURL release]
  1010 ms  -[NSURL release]
  1010 ms  -[NSURLSessionConfiguration setDisposition:0x7fff88b58508]

If we check the beginning of frida-trace, we can see something that is of interest to us:
           /* TID 0x407 */
  1003 ms  -[NSURL initWithString:0x7fa35550bb40]
  1008 ms     | -[NSURL initWithString:0x7fa35550bb40 relativeToURL:0x0]
  1008 ms  -[NSURL isFileReferenceURL]
  1008 ms     | -[NSURL _cfurl]
  1008 ms  -[NSURL retain]
-[NSURL initWithString] is being called at the beginning to initialize the URL object. This is the one that holds the string we are sending to it. Now let's go ahead and open the file at __handlers__/NSURL/initWithString_.js.
/*
 * Auto-generated by Frida. Please modify to match the signature of -[NSURL initWithString:].
 * This stub is currently auto-generated from manpages when available.
 *
 * For full API reference, see: https://frida.re/docs/javascript-api/
 */

{
  /**
   * Called synchronously when about to call -[NSURL initWithString:].
   *
   * @this {object} - Object allowing you to store state for use in onLeave.
   * @param {function} log - Call this function with a string to be presented to the user.
   * @param {array} args - Function arguments represented as an array of NativePointer objects.
   * For example use args[0].readUtf8String() if the first argument is a pointer to a C string encoded as UTF-8.
   * It is also possible to modify arguments by assigning a NativePointer object to an element of this array.
   * @param {object} state - Object allowing you to keep state across function calls.
   * Only one JavaScript function will execute at a time, so do not worry about race-conditions.
   * However, do not use this to store function arguments across onEnter/onLeave, but instead
   * use "this" which is an object for keeping state local to an invocation.
   */
  onEnter(log, args, state) {
    log(`-[NSURL initWithString:${args[2]}]`);
  },

  /**
   * Called synchronously when about to return from -[NSURL initWithString:].
   *
   * See onEnter for details.
   *
   * @this {object} - Object allowing you to access state stored in onEnter.
   * @param {function} log - Call this function with a string to be presented to the user.
   * @param {NativePointer} retval - Return value represented as a NativePointer object.
   * @param {object} state - Object allowing you to keep state across function calls.
   */
  onLeave(log, retval, state) {
  }
}

And frida-trace has generated a stub file for us to fill now, but there is something catching our attention here and that is that frida's stub is printing us ${args[2]}, why is that?
When we intercept ObjC objects, we need to take into account that the args[] array does not contain elements the same way it would on Windows or Linux binaries. This array instead stores args[0]->self args[1]->selector and args[2+(n-1)]->arguments.
Which translates into us having to work directly with args[2] instead to get the first argument and use this address to create ObjC.Object's instead.
Note: In case that the above formula is not clear if a function/method has 2 arguments the second argument address will be placed at args[3] in the args[] array (instead of the usual args[1]). - We will have an example of this later on.
We can now fill the stub using ObjC.Object and the address provided by args[2] as follows:
  onEnter(log, args, state) {
    log(`-[NSURL initWithString:${args[2]}]`);
    const myString = new ObjC.Object(args[2]);
    log(myString.toString());
  },
We create the object myString that holds the ObjC.Object, then this is rendered using the .toString() method so we can get an understandable representation. Then, the result is as follows:
           /* TID 0x407 */
  1003 ms  -[NSURL initWithString:0x7fa35550bb40]
  1003 ms  http://www.stackoverflow.com
  1008 ms     | -[NSURL initWithString:0x7fa35550bb40 relativeToURL:0x0]
  1008 ms  -[NSURL isFileReferenceURL]
  1008 ms     | -[NSURL _cfurl]
As we can see, when NSURL initWithString is called we are able to render to screen the string used to initialize the object.
Obj-C: Intercepting fileExistsAtPath
Now we will directly instrument an Objective-C application (so no Swift layer) - This is a simple application that just check whether a file exists using the NSFileManager API:
int main(int argc, const char * argv[]) {
    @autoreleasepool {
        NSString *filepath = @"/Users/fernandou/Desktop/test.c";
        NSFileManager *fileManager = [NSFileManager defaultManager];

        if ([fileManager fileExistsAtPath:filepath]) {
            NSLog(@"File exists.");
        }
        else {
            NSLog(@"File does not exist.");
        }
    return 0;
}

We will check using frida-trace that the NSFileManager API is indeed being called:
$ frida-trace -m "-[NSFileManager **]" -f objCLI
And the output we will be getting is:
/* TID 0x407 */
    60 ms  -[NSFileManager fileExistsAtPath:0x10f24f018]
    60 ms     | -[NSFileManager getFileSystemRepresentation:0x7ffee09b43e0 maxLength:0x400 withPath:0x10f24f018]
We will now learn how to get an address to -[NSFileManager fileExistsAtPath:] so that we can write an instrumentation script.
First, we will fire up Frida's REPL:
$ frida -f myObjCApp
Once we are inside the REPL, we need an API resolver to get the handler and so we will create it:
myResolver = new ApiResolver('ObjC');
This resolver has access to a method named enumerateMatchesSync, which we will use to our advantage. We will try to get all methods matching fileExists*:
myResolver.enumerateMatchesSync('-[NSFileManager fileExists*])
And this will return us two possible methods:
{caption: "enumerateMatchesSync output."}
[
    {
        "address": "0x7fff211855af",
        "name": "-[NSFileManager fileExistsAtPath:]"
    },
    {
        "address": "0x7fff2117d115",
        "name": "-[NSFileManager fileExistsAtPath:isDirectory:]"
    }
]
Now we have two addresses however, if we want to automate we will have to be more specific which translates in avoid using the wildcard operator and writing the method the way we want it:
[Local::objCLI]-> myResolver.enumerateMatchesSync("-[NSFileManager fileExistsAtPath:]")
[
    {
        "address": "0x7fff211855af",
        "name": "-[NSFileManager fileExistsAtPath:]"
    }
]
And now we have the address of the -[NSFileManager fileExistsAtPath:] method. What is left is to actually write our instrumentation script:
{caption: "ObjC address hook implementation."}
const myResolver = new ApiResolver('ObjC');

const NSFileManagerFileExistsPtr = ptr(myResolver.enumerateMatchesSync('-[NSFileManager fileExists*]')[0].address) // It returns a list so we need to grab the first element and obtain the address.

Interceptor.attach(NSFileManagerFileExistsPtr, {
    onEnter(args) {
        const filePath = new ObjC.Object(args[2]);
        console.log("[frida] filepath: " + filePath.toString());
    }
});

And we can inject this script via:
$ frida -l agent.js myObjCApp
Which results in the following output:
[Local::objCLI]-> [frida] filepath:  path/Users/fernandou/Desktop/test.c
2021-02-16 07:54:52.802 objCLI[1087:22680899] File exists.
And that's it! We have created our first instrumentation script for ObjC apps without REPL interaction.
ObjC: Methods with multiple arguments.
We can take a step further and read a method that has two arguments instead of a single one. For this purpose, we will modify the previous program to call [fileManager fileExistsAtPath: isDirectory:] instead.
We will also use Frida's REPL to get the method pointer differently.
int main(int argc, const char * argv[]) {
    @autoreleasepool {
        NSString *filepath = @"/Users/fernandou/Desktop/test.c";
        NSFileManager *fileManager = [NSFileManager defaultManager];
        BOOL res;

        if ([fileManager fileExistsAtPath:filepath isDirectory:&res]) {
            NSLog(@"File exists.");
        }
        else {
            NSLog(@"File does not exist.");
        }
    }
    return 0;
}

isDirectory will be nil in case the target path is not a folder.
Now we build the file and fire up frida's REPL. From there, we will now see how to get the pointer to a method using the ObjC.classes object which maps ObjC classes to JavaScript objects. If we write in Frida's REPL ObjC.classes we can see that it begins to autocomplete:

For instance if we want to know all methods available in ObjC.classes.NSFileManager we can do it using $ownMethods which returns an array containing native method names exposed by the object class:
[Local::objCLI]-> ObjC.classes.NSFileManager.$ownMethods
[
    "+ defaultManager",
    "- dealloc",
    "- delegate",
    "- setDelegate:",
    "- fileExistsAtPath:",
    "- createDirectoryAtPath:withIntermediateDirectories:attributes:error:",
    "- createDirectoryAtURL:withIntermediateDirectories:attributes:error:",
    "- homeDirectoryForCurrentUser",
    "- URLsForDirectory:inDomains:",
    "- getRelationship:ofDirectoryAtURL:toItemAtURL:error:",
    "- enumeratorAtURL:includingPropertiesForKeys:options:errorHandler:",
    "- temporaryDirectory",
    "- stringWithFileSystemRepresentation:length:",
    "- removeItemAtPath:error:",
    "- enumeratorAtPath:",
    "- contentsOfDirectoryAtPath:error:",
    "- isExecutableFileAtPath:",
    "- destinationOfSymbolicLinkAtPath:error:",
    ...
If we take a look at the list, we can see that the - fileExistsAtPath:isDirectory: method is available to us. We can access it and then its member .implementation which returns a pointer to the mapped object:
[Local::objCLI]-> t = ObjC.classes.NSFileManager['- fileExistsAtPath:isDirectory:'].implementation
function
[Local::objCLI]-> ptr(t)
"0x7fff2117d115"
Once we have this information, we can do something similar to what we have seen before except that this time it won't be args[2] the element storing our interesting parameter but args[3] instead:
Interceptor.attach(ptr(t), {
   onEnter(args) {
     this.isDir = args[3];
   },
   onLeave(retval) {
     let objCIsDir = new ObjC.Object(this.isDir); console.log(objCIsDir);
   }
})
And once we %resume:
[Local::objCLI]-> %resume
2021-02-16 22:48:51.725 objCLI[96805:23540150] File exists.
[Local::objCLI]-> nil
It says our .c file is not a directory so the parameter is set to nil after method execution.
ObjC: Reading a CFDataRef
This came up as a question in the Frida IRC/Telegram channel and I thought it was interesting to illustrate it in these pages. The question in turn is how to access CFDataRef bytes. For this use case, we will write a small example application:
#import <Foundation/Foundation.h>

void print_ptr(CFDataRef dRef) {
    NSLog(@"%@", dRef);
}

int main(int argc, const char * argv[]) {

    @autoreleasepool {
        const UInt8 *myString = "foobar";
        CFDataRef data = CFDataCreateWithBytesNoCopy(NULL, myString, strlen(myString), kCFAllocatorNull);

        NSLog(@"%p", print_ptr);
        getchar();
        print_ptr(data);
    }
    return 0;
}

In this example we have a print_ptr function that prints the CFDataRef named data which is created calling CFDataCreateWithBytesNoCopy and we are using as a string a simple one: foobar.
For illustration purposes, we will print the address of the print_ptr function and call getchar() so that we can copy the address and fire up Frida"s REPL.
Note: You can infer the address by calling Process.enumerateExportsSync() then calling Module.enumerateExportsSync() and getting the print_ptr()pointer
[Local::objCLI]-> printPtr = ptr(0x10606c20)
[Local::objCLI]-> Interceptor.attach(printPtr, {
    onEnter(args) {
        cfData = new ObjC.Object(args[0]);
        cfString = cfData.bytes().readUtf8String();
        console.log(`string output: ${cfString}`);
    }
})
[Local::objCLI]-> %resume
[Local::objCLI]-> string output: foobar
Firsts things first, since we are defining a C function we don't have to think about args[2] this time but args[0] instead to get our first argument.
If we try to print the argument without parsing it, we will get this output:
{length = 6, bytes = 0x666f6f626172}
So, we get the bytes and bytes length but not the representation of the string. For this purpose, we can access the .bytes() method in ObjC.Object and from this representation call .readUtf8String() to read it as an UTF8 string.
In the case that it is not an UTF8 string, be sure to use the appropriate method to read it.
Getting CryptoKit's AES.GCM.seal data before encryption
CryptoKit has an AES class to encrypt and decrypt data using AES-GCM-128 bits up to 256. With Frida, it is possible to obtain the data and the key before data is encrypted, so let's write up a quick example:
import Foundation
import CryptoKit

let pass = "foobar"
let data = "frida is fun!".data(using: .utf8)!
let key = SymmetricKey(data: SHA256.hash(data: pass.data(using: .utf8)!))
let iv = AES.GCM.Nonce()
let mySealedBox = try AES.GCM.seal(data, using: key, nonce: iv)
let dataToShare = mySealedBox.combined?.base64EncodedData()
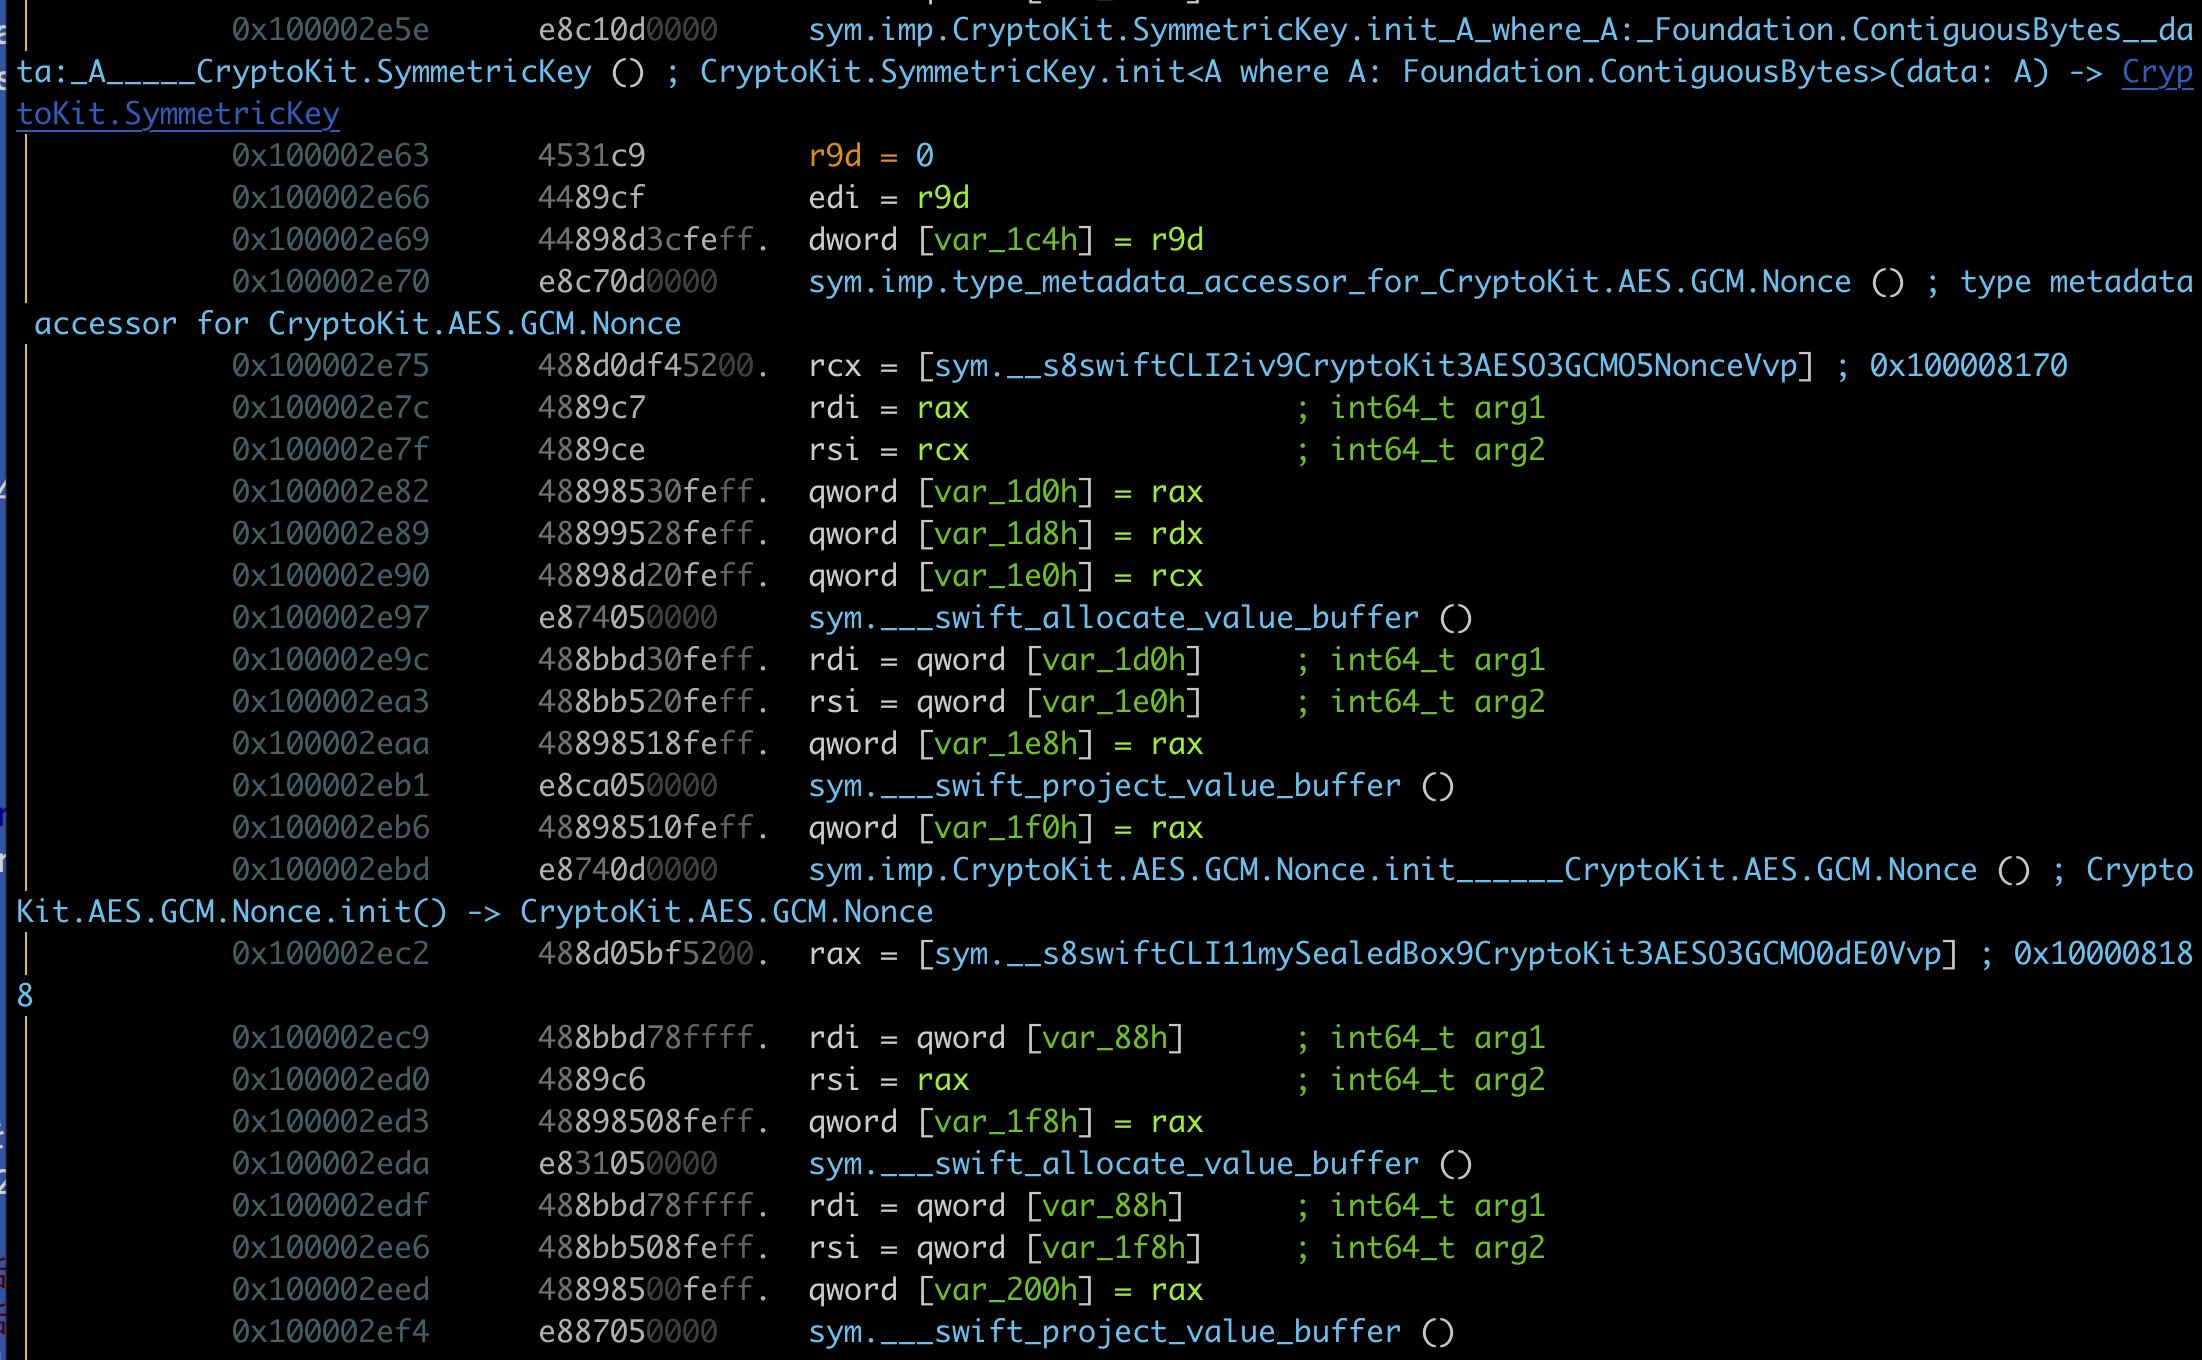
This simple example takes the "frida is fun!" string and encrypts it using "foobar" as key. After building this sample, we can disassemble the binary before opening it up in Frida. What we will find in the list of functions is:
0x100003c30    1 6            sym.imp.static_CryptoKit.AES.GCM.seal_A_where_A:_Foundation.DataProtocol___:_A__using:_CryptoKit.SymmetricKey__nonce:_Swift.Optional_CryptoKit.AES.GCM.Nonce___throws____CryptoKit.AES.GCM.SealedBox
0x100003c42    1 6            sym.imp.CryptoKit.AES.GCM.SealedBox.combined.getter_:_Swift.Optional_Foundation.Data
0x100003c48    1 6            sym.imp.type_metadata_accessor_for_CryptoKit.AES.GCM.SealedBox
And if we check the dissassembly itself we can find that the CryptoKit function we wrote is being called:
Now, we can fire up Frida and check our binary imports (I named this example binary swiftCLI):
Module.enumerateImportsSync("swiftCLI")
And we can quickly notice our target among all the imports:
...
    {
        "address": "0x7fff56762210",
        "module": "/System/Library/Frameworks/CryptoKit.framework/Versions/A/CryptoKit",
        "name": "$s9CryptoKit3AESO3GCMO4seal_5using5nonceAE9SealedBoxVx_AA12SymmetricKeyVAE5NonceVSgtK10Foundation12DataProtocolRzlFZ",
        "slot": "0x10079d030",
        "type": "function"
    },
...

There are other functions that might be interesting to inspect but they are not needed in this case:
$s8swiftCLI3key9CryptoKit12SymmetricKeyVvp
$s8swiftCLI2iv9CryptoKit3AESO3GCMO5NonceVvp
$s8swiftCLI11mySealedBox9CryptoKit3AESO3GCMO0dE0Vvp
Once we now the function name we want to instrument, we can see that the first and second arguments are the data and the key respectively.
For illustration purposes, the script we will write will print the values of the data and the key but also the hexdump so we can see that everything is indeed stored in memory:
let imports = Module.enumerateImportsSync("swiftCLI");

imports.forEach(function(value) {
  if (value.name === "$s9CryptoKit3AESO3GCMO4seal_5using5nonceAE9SealedBoxVx_AA12SymmetricKeyVAE5NonceVSgtK10Foundation12DataProtocolRzlFZ") {
    console.log("[+] Address: " + value.address);
    Interceptor.attach(value.address, {
      onEnter(args) {
        console.log("Raw data: " + args[0].readCString());
        console.log(hexdump(args[0]));
      }
    });
  }
});
And after running our script:
frida -l script.js -f swiftCLI --no-pause
We can get the raw data and spot the key:
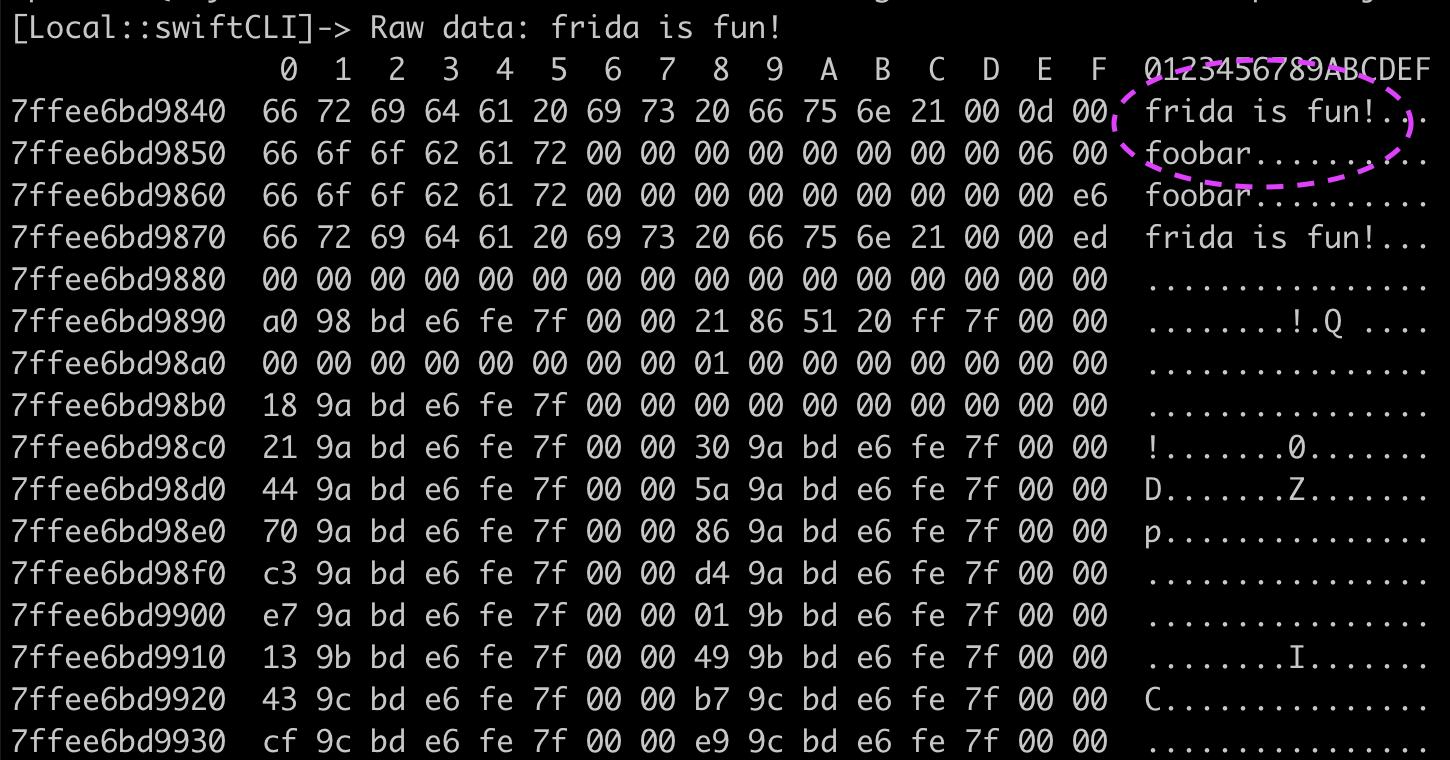
One thing we are able to notice is that in memory our password is always 3 bytes after the data that is going to be encrypted. This means, we could shift the length of our data (which we obtain via readCString()) and add our magical offset 0x3, so we will modify our code to be able to intercept the key:
let imports = Module.enumerateImportsSync("swiftCLI");

imports.forEach(function(value) {

  if (value.name === "$s9CryptoKit3AESO3GCMO4seal_5using5nonceAE9SealedBoxVx_AA12SymmetricKeyVAE5NonceVSgtK10Foundation12DataProtocolRzlFZ") {
    console.log("[+] Address: " + value.address);
    Interceptor.attach(value.address, {
      onEnter(args) {
        let rawData = args[0].readCString();
        let key = args[0].add(rawData.length + 0x3).readCString();

        console.log("Raw data: " + rawData);
        console.log("Key: " + key);

      },
    });
  }
});
And after running it, we get the following output:
[Local::swiftCLI]-> Raw data: frida is fun!
Key: foobar
Swift.String
Another thing you might have noticed is that strings are inlined when they are small but once they grow bigger than 15 bytes it is not possible to parse them easily as before. The reason is Swift's memory layout for string types.
To test this, we are going to take a very basic Swift example: A program that builds a hello string and receives the person's name as an argument.
func greet(person: String) -> String {
    let greeting = "Hello, " + person + "!!"
    return greeting
}

let greeting = greet(person: "Ole Andre Vadla Ravnas")

print(greeting)
For <= 15 byte strings, flags are stored in the latest byte and the string itself are the first 15 bytes. We can read the string as usual.
For strings longer than 16 they are considered large by Swift's memory layout and thus are split in 8 bytes for countAndFlagsBits which is an UInt64 containing flags such as isASCII, isNFC, isNativelyStored and 8 bytes for a Builtin.BridgeObject.
According to Swift's ABI data is split in two registers (which we can quickly check in ) rax for metadata where LSB(Least Significant Bit) is length and MSB(Most Significant Bit) contains flags. rdx register should contain on the LSB the pointer to the string which offsetted by 32 is our string. MSB stores again flags/metadata.
Now, we will instrument the greet(person: String) -> String function. Since Swift's exports are mangled, first we will check the exports to find the name of our target function:
[Local::swiftCLI]-> Module.enumerateExportsSync("swiftCLI")
[
    {
        "address": "0x108a4f000",
        "name": "_mh_execute_header",
        "type": "variable"
    },
    {
        "address": "0x108a52a80",
        "name": "main",
        "type": "function"
    },
    {
        "address": "0x108a52dc0",
        "name": "$s8swiftCLI5greet6personS2S_tF",
        "type": "function"
    },
    {
        "address": "0x108a57048",
        "name": "$s8swiftCLI8greetingSSvp",
        "type": "variable"
    }
]
And so we get our function named $s8swiftCLI5greet6personS2S_tF. Now, we can instrument it:
const greetFuncPtr = Module.getExportByName(null, '$s8swiftCLI5greet6personS2S_tF');

Interceptor.attach(greetFuncPtr, {
    onEnter(args) {
    // Note: this.context.rdx === args[1]
    const tmpAddr = this.context.rdx.and('0xFFFFFFFFFF').toString(16);
    const lsbAddr = ptr(new UInt64('0x' + tmpAddr));
    console.log(lsbAddr.add(32).readCString());
});

Which outputs the string:
[Local::swiftCLI]-> Ole Andre Vadla Ravnas
Note: Tested under Swift 5. This information should be stable but Swift's memory layout might change anytime in later versions.
Since reading Swift's ABI can be a tough task, I recommend reading TannerJin's Swift-MemoryLayout repository with very good explanations of Swift's core types.