Intermediate usage
Defining globals in Frida's REPL
One thing we notice when executing scripts via Frida's REPL (frida -l script.js) is that any variables we have in our script are not accessible after it has been executed. The reason is that the code inside frida-compile (in the REPL) runs inside an anonymous function so that variables aren't leaked out to the global namespace.
To achieve this behaviour, we ned to use the global trick. Say we have a variable named CreateFileWPtr that stores the pointer to CreateFileW function, we would create it this way:
const CreateFileWPtr = Module.getExportByName('kernelbase.dll', 'CreateFileW')
But we wouldn't be able to access it from REPL. So, we use the following syntax:
(global).variableName = realVariable - For JavaScript.
(global as any).variableName = realVariable - For TypeScript.
Where realVariable is any variable, const, function we want to expose. So for our CreateFileWPtr:
(global).CreateFileWPtr = CreateFileWPtr
or
(global as NativePointer).CreateFileWPtr = CreateFileWPtr
And once we run our small script we can access our variable:
frida -l globalstest.js notepad.exe
[Local::notepad.exe]-> CreateFileWPtr
"0x7f7a59bfe500"
Following child processes
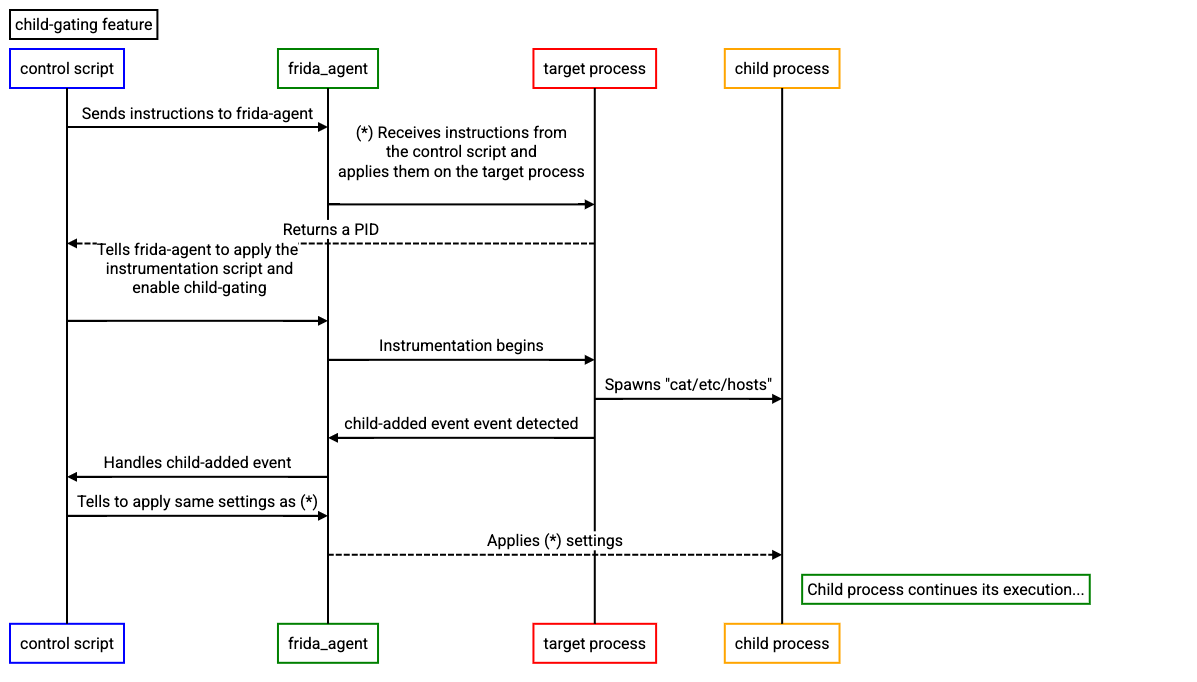
In previous pages we have seen how to create a basic control script to inject our instrumentation agent in a target process. What we want to do now is to detect child processes using Frida's child-gating feature. Note: This feature is not available from the CLI tools (Frida's REPL and frida-trace).
It is important to understand that the child-gating feature is OS-dependent and hence will not detect every possible way to spawn a child-process. Windows detects CreateProcessInternalW calls to follow child processes while on Linux it detects fork() and vfork() calls.
For this example, we use the official Frida's child-gating script (after all, we don't need to reinvent the wheel) and explain it:
# -*- coding: utf-8 -*-
from __future__ import print_function

import threading

import frida
from frida_tools.application import Reactor


class Application(object):
    def __init__(self):
        self._stop_requested = threading.Event()
        self._reactor = Reactor(run_until_return=lambda reactor: self._stop_requested.wait())

        self._device = frida.get_local_device()
        self._sessions = set()

        self._device.on("child-added", lambda child: self._reactor.schedule(lambda: self._on_child_added(child)))
        self._device.on("child-removed", lambda child: self._reactor.schedule(lambda: self._on_child_removed(child)))
        self._device.on("output", lambda pid, fd, data: self._reactor.schedule(lambda: self._on_output(pid, fd, data)))

    def run(self):
        self._reactor.schedule(lambda: self._start())
        self._reactor.run()

    def _start(self):
        argv = ["/bin/sh", "-c", "cat /etc/hosts"]
        env = {
            "BADGER": "badger-badger-badger",
            "SNAKE": "mushroom-mushroom",
        }
        print("✔ spawn(argv={})".format(argv))
        pid = self._device.spawn(argv, env=env, stdio='pipe')
        self._instrument(pid)

    def _stop_if_idle(self):
        if len(self._sessions) == 0:
            self._stop_requested.set()

    def _instrument(self, pid):
        print("[*] attach(pid={})".format(pid))
        session = self._device.attach(pid)
        session.on("detached", lambda reason: self._reactor.schedule(lambda: self._on_detached(pid, session, reason)))
        print("[*] enable_child_gating()")
        session.enable_child_gating()
        print("[*] create_script()")
        script = session.create_script("""\
Interceptor.attach(Module.getExportByName(null, 'open'), {
  onEnter(args) {
    send({
      type: 'open',
      path: Memory.readUtf8String(args[0])
    });
  }
});
""")
        script.on("message", lambda message, data: self._reactor.schedule(lambda: self._on_message(pid, message)))
        print("[*] load()")
        script.load()
        print("[*] resume(pid={})".format(pid))
        self._device.resume(pid)
        self._sessions.add(session)

    def _on_child_added(self, child):
        print("[+] child_added: {}".format(child))
        self._instrument(child.pid)

    def _on_child_removed(self, child):
        print("[-] child_removed: {}".format(child))

    def _on_output(self, pid, fd, data):
        print("[*] output: pid={}, fd={}, data={}".format(pid, fd, repr(data)))

    def _on_detached(self, pid, session, reason):
        print("[-] detached: pid={}, reason='{}'".format(pid, reason))
        self._sessions.remove(session)
        self._reactor.schedule(self._stop_if_idle, delay=0.5)

    def _on_message(self, pid, message):
        print("[*] message: pid={}, payload={}".format(pid, message["payload"]))


app = Application()
app.run()
This script will instrument /bin/sh -c cat /etc/hosts which in turn spawns a child process (the cat command).
_startsets the application to instrument and its arguments. Once the process is spawned and suspended, its PID is sent to _instrument._instrumentattaches to the received PID and creates a session. This session sets the detached callback to log when a process is detached and the reason why it happened. Also session enables the child-gating feature usingsession.enable_child_gating(). Then, it creates a script using the string we pass it that instruments theopenfunction. After this, this script is sets message callback to receive message events from our instrumentation script. Once everything is set, our target process is resumed.on_child_addedcallback receives thechild-addedevent from our instrumented process and repeats step (2) again.- The instrumentation script continues its execution until no more processes are instrumented (this is, neither parent nor child processes are alive).
Although this can be a bit difficult to understand the following sequence diagram should be helpful:
When we are finished writing the script, we can run it and get the following output:
$ python3 script.py

[+] spawn(argv=['/bin/sh', '-c', 'cat /etc/hosts'])
[*] attach(pid=1471858)
[*] enable_child_gating()
[*] create_script()
[*] load()
[*] resume(pid=1471858)
[*] message: pid=1471858, payload={'type': 'open', 'path': '/dev/tty'}
[-] detached: pid=1471858, reason='process-replaced'
[+] child_added: Child(pid=1471858, parent_pid=1471858, origin=exec, path='/usr/bin/cat', argv=['cat', '/etc/hosts'], envp={...})
[*] attach(pid=1471858)
[*] enable_child_gating()
[*] create_script()
[*] load()
[*] resume(pid=1471858)
[-] child_removed: Child(pid=1471858, parent_pid=1471858, origin=exec, path='/usr/bin/cat', argv=['cat', '/etc/hosts'], envp={...})
[*] message: pid=1471858, payload={'type': 'open', 'path': '/etc/hosts'}
[*] output: pid=1471858, fd=1, data=b'127.0.0.1   localhost localhost.localdomain localhost4 localhost4.localdomain4\n::1         localhost localhost.localdomain localhost6 localhost6.localdomain6\n\n\n127.0.0.1 vertex\n::1       vertex\n'
[*] output: pid=1471858, fd=2, data=b''
[*] output: pid=1471858, fd=1, data=b''
[-] detached: pid=1471858, reason='process-terminated'
Creating NativeFunctions
It is possible to use NativeFunctions to create auxiliary functions we can call from JavaScript. This is useful in case that we want to call exports for our own sake or use the process's functions at will.
NativeFunction syntax:
new NativeFunction(address, returnType, argTypes[, abi])
What we need to create the NativeFunction object:
- A valid
pointerto a function. - Argument(s) types.
- Return value type.
- (Optional)
ABIor calling convention (stdcall,fastcall...)
Let's do a quick example, say way have the following add function:
int
add(int a, int b)
{
  return a + b;
}
And we want to call in our own terms at will, how do we create the native function? We are not taking into account for now the ABI. This leaves us with a=int, b=int, return=int. So, we can build our own NativeFunction now:
new NativeFunction(ptr(my_address), 'int', ['int', 'int'])
And we are able to call it in our own terms:
const myAdd = new NativeFunction(ptr(0x0065fd40), 'int', ['int', 'int']);

myAdd(10, 10);
In case that you are sure the ABI is _fastcall for example, you can add the calling convention parameter:
new NativeFunction(ptr(my_address), 'int', ['int', 'int'], 'fastcall)
Using NativeFunction to call system APIs
We can now reuse the previously acquired knowledge to create a NativeFunction from a known system API and call it ourselves. When doing this, as mentioned before we must be very careful when setting up the function parameters and return values but also the types we are passing to the function when called.
In this first example, we are going to create a NativeFunction from the mkdir API:
#include <sys/types.h>
#include <sys/stat.h>
#include <unistd.h>
#include <stdio.h>

void
main()
{
    mkdir("/home/fernandou/frida/test_folder", 0700);

    struct stat st = { 0 };
    if (stat("/home/fernandou/frida/test_folder", &st) == -1)
    {
        puts("Folder does not exist.\n");
    }
    else
    {
        puts("Folder exists.\n");
    }
}
We can then run the program in Frida's REPL:
$ clang mkdir.c -o cMkdir
$ frida -f cMkdir
Once we are inside the program, we first need a pointer to the mkdir API:
[Local::a.out]-> mkdir = Module.getExportByName(null, 'mkdir')
"0x7fff204ca3b4"
Once we have the pointer we have build our NativeFunction. The argument that mkdir is receiving is a const char* so we need to set the argument as a pointer and allocate an UTF8 string to pass it:
[Local::a.out]-> folderName = Memory.allocUtf8String("fridahandbook")
"0x108b6dbe0"
const when passing allocated buffers to NativeFunctions.
We allocate the string fridahandbook as we want that as the folder name and then we need to create the NativeFunction:
[Local::a.out]-> frida_mkdir = new NativeFunction(mkdir, 'int', ['pointer'])
function
[Local::a.out]-> frida_mkdir(folderName)
0
[Local::a.out]->
Thank you for using Frida!

➜  frida ls -l
d---r-----   2 fernandou  primarygroup           64 26 Feb 14:22 fridahandbook
We create our nativefunction with pointer as argument and return value of int, it is not neccesary in this example to specify the ABI. Once we have defined the NativeFunction, we can then call it using the previously allocated UTF8 string buffer. We can see that the return value is 0 which as per man pages documentation states:
mkdir() and mkdirat() return zero on success, or -1 if an error occurred (in which case, errno is set appropriately).
Which means our NativeFunction worked flawlessly and we have our folder created!
Modifying return values
In case we want to modify the external control flow of the program or indicate that a function call's output is different we can do it using the .replace() method. A quick example is KERNEL32.DLL!MoveFileW which returns 0 if the function fails or anything but zero if it succeeds.
Let's say the program is checking if a file was moved before continuing, but we only want it to believe that it was actually moved:
const retvalOne:NativePointer = ptr(0x1);
class MoveFileW {
    onLeave(retval:NativeReturnValue) {
        retval.replace(retvalOne);
    }
}
NativeReturnValue has access to the retval method and we can use it to modify objects. It is again recommended to work with const as much as possible to prevent problems.
Access values after usage
Sometimes we want to know what has changed in an entry parameter during the function execution or we want to know how a buffer’s contents changes, what is written to it or change the value after execution. It is possible to do this with Frida however, we need to take into account some extra information.
If we want to store any of the original arguments of a function, keep it mind that these will always be NativePointers unless we do anything to them with an API such as .readUtf16String() – But this is not what we want to do when we need to see how they have changed.
Basic structure
class myInstrumentedFunction{
  firstParam:NativePointer = null;

  onEnter(args:NativePointer[]) {
    this.firstParam = args[0];
  }

  onLeave(retval:NativeReturnValue) {
    console.log(this.firstParam.readCString())
  }
}
The first thing we want to do is creating the variable we want to access during the onLeave stage and give it a NativePointer type. After that, we will store the pointer to the argument firstParam using the this keyword. In this case, the this keyword affects the class scope so it is accessible during both stages.
Then we can access it during the onLeave stage. In case that it was a buffer, we can print it during the onLeave stage using this.firstParam.readCString() to see its contents or we can check its contents with the hexdump() API.
We will now work with a real example of how this can be used for.
CryptDecrypt: A practical case.
The CryptDecrypt API is the perfect example about the aforementioned subject. Let’s see what MSDN has about this API:
BOOL CryptDecrypt(
  HCRYPTKEY  hKey,
  HCRYPTHASH hHash,
  BOOL       Final,
  DWORD      dwFlags,
  BYTE       *pbData,
  DWORD      *pdwDataLen
);
MSDN notes:
pbData

A pointer to a buffer that contains the data to be decrypted. After the decryption has been performed, the plaintext is placed back into this same buffer.

The number of encrypted bytes in this buffer is specified by pdwDataLen.
So we have an hKey but that is not the most important argument for us in this, it is the *pbData pointer and the *pwdDataLen pointer. The way this API works is that once the function body is executed and we are in the onLeave or return stage the pbData pointer which is initially encrypted is decrypted and we can read it.
To achieve this, we will need to store the pointers of pbData and pdwDataLen to be able to access them later on.
class CryptDecrypt {
  buffer_size? : NativePointer;
  buffer? : NativePointer;

  onEnter (args:NativePointer[]) {
    this.buffer = args[4];
    this.buffer_size = args[5];
  }

  onLeave (retval:InvocationReturnValue) {
    this.buffer.readCString(this.buffer_size);
  }
}
In this case we first have a variable we want to store, which is buffer_size matching args[5] and buffer matching args[4] – Hence what we want to do is to keep the address that they are pointing to at the beginning of the function and see how they have changed in the end. If we try to inspect this.buffer = args[4] during onEnter, we will only get random or unintelligible data. However, once we enter the onLeave stage we can see the decrypted data and the size of it.
In case that what we are trying to inspect is not a string or a number we can work with the hexdump API specially if we know about the length:
class CryptDecrypt {
  buffer_size?:NativePointer;
  buffer?:NativePointer;

  onEnter (args:NativePointer[]) {
    this.buffer = args[4];
    this.buffer_size = args[5];
  }

  onLeave (retval:InvocationReturnValue) {
    let buffer_size;

    if (this.buffer_size) {
      hexdump(this.buffer,{ length:
              this.buffer_size.readPointer().toInt32()
      });
    }
  }
}
Modifying values before execution
In case we are interested in modifying input values when a function is called and that is the only thing you want to do then it is safe to say that modifying function parameters is a safe bet, but it must be done with caution.
If what we want to do is calling functions with custom parameters for our own sake (e.g. calling CreateFileW to return us a HANDLE) then it is best to create a NativeFunction and do it that way. In case what we want to do is replace arguments when a function is called, this is what we are here for.
Say we have a program that checks if a file exists, if this file does exist then the program will not continue its execution. We do not want to remove this file because it is a dependency for other programs in our environment. What we are going to do is to deceive the program to redirect it to a different path.
This is our sample program:
#include <sys/types.h>
#include <sys/stat.h>
#include <unistd.h>
#include <stdio.h>

void
main()
{
    struct stat st = { 0 };
    if (stat("/bin/ls", &st) == -1)
    {
        puts("File does not exist.\nInstalling our own busybox binaries");
        // execute real code
    }
    else
    {
        puts("Folder exists.\n");
        // exit without doing anything
    }
}
This program is similar to the one that we have seen before, it calls stat to check if the file exists and if it doesn't it continue its execution.
In this case, our first idea would be to get the pointer to the stat function but that will lead us to an error. Frida will give us a valid pointer to stat but that address is not the one that is going to be called in the end. For this, we will check with a disassembler (radare2 in my case) and Frida:

As we can notice by checking the disassembly:
│           0x100003ed6      e843000000     sym.imp.memset ()          ; void *memset(void *s, int c, size_t n)
│           0x100003edb      488d3d7c0000.  rdi = [str.bin_ls]         ; section.3.__TEXT.__cstring
│                                                                      ; 0x100003f5e ; "/bin/ls"
│           0x100003ee2      488bb568ffff.  rsi = qword [var_98h]
│           0x100003ee9      e83c000000     sym.imp.stat_INODE64 ()
│           0x100003eee      83f8ff         var = eax - 0xffffffffffffffff
│       ┌─< 0x100003ef1      0f8511000000   if (var) goto 0x100003f08
What ends up being called is stat_INODE64. Now we will check how this function is named in in Frida's REPL:
[Local::a.out]-> Module.enumerateImports("a.out")
[
    {
        "address": "0x7fff2051725c",
        "module": "/usr/lib/libSystem.B.dylib",
        "name": "dyld_stub_binder",
        "slot": "0x103229000",
        "type": "function"
    },
    {
        "address": "0x7fff205456f8",
        "module": "/usr/lib/libSystem.B.dylib",
        "name": "memset",
        "slot": "0x10322d000",
        "type": "function"
    },
    {
        "address": "0x7fff20410274",
        "module": "/usr/lib/libSystem.B.dylib",
        "name": "puts",
        "slot": "0x10322d008",
        "type": "function"
    },
    {
        "address": "0x7fff204ca39c",
        "module": "/usr/lib/libSystem.B.dylib",
        "name": "stat$INODE64",
        "slot": "0x10322d010",
        "type": "function"
    }
]
And in this list we can notice a mangled name:
    {
        "address": "0x7fff204ca39c",
        "module": "/usr/lib/libSystem.B.dylib",
        "name": "stat$INODE64",
        "slot": "0x10322d010",
        "type": "function"
    }
This means that if we want to call Module.getExportByName we need the stat$INODE64 function name instead of stat.
Once we have this data, we can write our instrumentation script:
const redirectString = Memory.allocUtf8String("/bin/foobar");
const statPtr = Module.getExportByName(null, "stat$INODE64");

Interceptor.attach(statPtr, {
  onEnter(args) {
    const firstArg = args[0];
    let statArg = firstArg.readUtf8String();
    console.log("stat is checking: " +
                firstArg.readUtf8String());
    if (statArg.indexOf("bin/ls") != -1) {
      args[0] = redirectString;
    }

    console.log("final stat path: " +
                args[0].readUtf8String());
  }
});
We can fire this script up:
$ frida -f a.out -l script.js --no-pause
And the output:
➜  Desktop frida -f a.out -l script.js --no-pause
     ____
    / _  |   Frida 14.2.12 - A world-class dynamic instrumentation toolkit
   | (_| |
    > _  |   Commands:
   /_/ |_|       help      -> Displays the help system
   . . . .       object?   -> Display information about 'object'
   . . . .       exit/quit -> Exit
   . . . .
   . . . .   More info at https://www.frida.re/docs/home/
Spawned `a.out`. Resuming main thread!
File does not exist.
Installing our own busybox binaries
stat is checking: /bin/ls
final stat path?: /bin/foobar
[Local::a.out]-> Process terminated
Is the one we expected, stat parameter gets redirected to /bin/foobar instead.
Undoing instrumentation
There are times when we want to destroy instrumenting a function after a certain set of conditions happen either because we do not have any more checks to do against this instrumented code or because it is going to impact the process's performance. With Frida it is possible to undo hooks in runtime. For this part, we will reuse the previous example but it will check two files instead:
#include <sys/types.h>
#include <sys/stat.h>
#include <unistd.h>
#include <stdio.h>

void
check_file(char* path)
{
    struct stat st = { 0 };
    if (stat(path, &st) == -1)
    {
        printf("File [%s] does not exist.\n", path);
    }
    else
    {
        printf("File [%s] does not exist.\n", path);
    }
}
void
main()
{
    check_file("/bin/ls");
    check_file("/bin/cd");
}
So now, we want to check if ls exists but we do not want to do any further checks. For this, we will undo instrumentation using InvocationListener which is what Interceptor.attach returns (we can check this if we are using Frida with TypeScript's autocomplete).
Our script will be:
const redirectString = Memory.allocUtf8String("/bin/foobar");
const statPtr = Module.getExportByName(null, "stat$INODE64");

let statListener = Interceptor.attach(statPtr, {
    onEnter(args) {
        this.removeHook = false;
        let statArg = args[0].readUtf8String();
        console.log("stat is checking: " + args[0].readUtf8String());
        if (statArg.indexOf("bin/ls") != -1) {
            args[0] = redirectString;
            this.removeHook = true;
        }

        console.log("final stat path?: " + args[0].readUtf8String());
    },

    onLeave(retval) {
        if (this.removeHook) {
            console.log("Removing stat instrumentation...");
            statListener.detach();
        }
    }
});
In this case we set statListener to the return of Interceptor.attach, then we will also set a shared variable between onEnter and onLeave named this.removeHook which is by default set to false. In case we want to remove instrumentation and this variable is set to true, we can call the detach() method of statListener and remove instrumentation.
And finally, this is the output we get:
$ frida -f a.out -l script.js --no-pause

File [/bin/ls] does not exist.
File [/bin/cd] does not exist.
stat is checking: /bin/ls
final stat path?: /bin/foobar
Removing stat instrumentation...
[Local::a.out]-> Process terminated
We can see that our instrumentation code is checking stat until /bin/ls is checked. Right afterwards, we will drop instrumentation and let the process run as usual.
std::string
Something that is very interesting to us is the ability to read strings, however this is not always possible by simply calling Frida's readUtf8String/readCString built-ins due to the different ways a string can be represented. For example, Window's UNICODE_STRING is defined in a struct as follows:
typedef struct _UNICODE_STRING {
  USHORT Length;
  USHORT MaximumLength;
  PWSTR  Buffer;
} UNICODE_STRING, *PUNICODE_STRING;
A common string type to parse is a C++ std::string. A similar concept will be seen in Swift.String's datatype later on. For std::string's the LSB (Least Significant Bit) will store 0 if it's a short string (< 22 bytes) or 1 for long strings. If it's a long string, the pointer to the string we want to get will be stored at two times the Process.pointerSize of the process we are attached to.
To test this knowledge out and see how to obtain the string, let's see this simple program:
#include <iostream>

void print_std_string(std::string arg_1)
{
    std::cout << arg_1 << std::endl;
}

int
main(void)
{
    std::string my_string = "Frida is great, you should check it out at frida.re";
    print_std_string(my_string);
    return 0;
}
This program simply calls the print_std_string(std::string arg_1) function and prints it to screen. This way it is easy to get the std::string parameter and inspect it.
Once we fire up this program in Frida's REPL and run Module.enumerateExportsSync() on our binary we notice that names are mangled, but due to the name we have chosen for the test function we can spot a mangled function named _Z16print_std_stringNSt3__112basic_stringIcNS_11char_traitsIcEENS_9allocatorIcEEEE. This is the function we want to use Interceptor.attach on.
Interceptor.attach(Module.getExportByName(null, '_Z16print_std_stringNSt3__112basic_stringIcNS_11char_traitsIcEENS_9allocatorIcEEEE'), {
    onEnter (args) {
        const LSB = args[0].readU8() & 1;
        console.log('LSB: ' + LSB);
        const stdString = args[0].add(Process.pointerSize*2).readPointer().readUtf8String();
        console.log("std::string: " + stdString);
    }
});
Then, we can run this small script and get the following output:
LSB: 1
std::string: Frida is great, you should check it out at frida.re
[Local::a.out]-> Process terminated
It is important to address that this was tested using clang++ 12.0.0, the memory layout may differ within compilers such as GCC which implements unions to store small strings.
std::vector
Another common use-case is to examine a std::vector. The way an std::vector<> is represented in memory varies on the process architecture and compiler, in this example we are going to demonstrate how it works under clang++.
// clang++ vectortest.cc
#include <vector>
#include <iostream>

void print_vector_size(std::vector<int> v)
{
    std::cout << "vector size:" << v.size() << std::endl;
}

int main()
{
    std::vector<int> v = {1, 2, 3, 4, 5, 6, 7, 8, 9, 10};
    print_vector_size(v);
    return 0;
}
The above code shows a very simple procedure where a function prints the length of the vector. When inspecting a vector, the most important thing to be aware of is of its size and its datatype(s). Given the data-type it is possible to iterate over the pointer up to the latest element of the vector. The way this vector is represented in memory is as follows:
           0  1  2  3  4  5  6  7  8  9  A  B  C  D  E  F  0123456789ABCDEF
020676f0  01 00 00 00 02 00 00 00 03 00 00 00 04 00 00 00  ................
02067700  05 00 00 00 06 00 00 00 07 00 00 00 08 00 00 00  ................
02067710  09 00 00 00 0a 00 00 00 f1 e8 00 00 00 00 00 00  ................
Every 4 bytes there is a member of the vector from 0x01 to 0x0a. The tail of this vector can be obtained by offsetting the original pointer by the Process.pointerSize (in this case a 64-bit application the pointerSize=8). Because every member of the vector is an int every 4 bytes of the vector it is possible to obtain the value of the it.
In other words:
std::vectorpointer at offset 0: Stores the pointer to the head of the vector.std::vectorpointer at offset Process.pointerSize: Stores the pointer to the tail of the vector.
To test this out, the following code will iterate every member of the std::vector and store them in a list:
const vectorPrintPtr = ptr(0x00400af0);

Interceptor.attach(vectorPrintPtr, {
    onEnter(args) {
    this.args_0 = args[0];
        const finalAddr = this.args_0.add(8).readPointer();
        this.startAddr = this.args_0.readPointer();
        this.vector_size = 0;
        this.elements = [];
        while (this.startAddr < finalAddr) {
            this.vector_size += 1;
            this.elements.push(this.startAddr.readInt());
            this.startAddr = this.startAddr.add(0x4);
        }
        console.log(this.elements);
        console.log('vector_size:' + this.vector_size);
    }
})
And when running this instrumentation script we get the following output:
[Local::a.out ]->
1,2,3,4,5,6,7,8,9,10
vector_size:10
std::vector in MSVC
MSVC++ generates a different memory layout for the vector structure. In this case the head of the pointer is not placed at the address that the pointer points to. Instead the address of the head is found by offsetting the pointer by the Process.pointerSize. The head of the tail is at double the pointerSize of the process (in 64-bit, that is the 16).
In short:
- The pointer that points to the address of the vector head is placed at Process.pointerSize
- The pointer that points to the address of the vector tail is placed at double the Process.pointerSize
Which leaves us with the following code:
const vectorPrintPtr = ptr(0x00400af0);

Interceptor.attach(vectorPrintPtr, {
    onEnter(args) {
    this.args_0 = args[0];
        const finalAddr = this.args_0.add(Process.pointerSize * 2).readPointer();
        this.startAddr = this.args_0.add(Process.pointerSize).readPointer();
        this.vector_size = 0;
        this.elements = [];
        while (this.startAddr < finalAddr) {
            this.vector_size += 1;
            this.elements.push(this.startAddr.readInt());
            this.startAddr = this.startAddr.add(0x4);
        }
        console.log(this.elements);
        console.log('vector_size:' + this.vector_size);
    }
})
And when instrumenting our MSVC application the instrumentaiton script prints the following output:
[Local::vectortest.exe ]->
1,2,3,4,5,6,7,8,9,10,11
vector_size:11
Operating with ArrayBuffers
Lots of situations will require working directly with ArrayBuffers but operating with them might not be straightforward because data might not always be simple strings. To get a better understanding of how to operate with them in Frida we will use the fprintf function and replace the contents of the second argument (our aim is to replace "target" to "foobar").
int main(int argc, char *argv[]){
        if(argc < 3){
                fprintf(stderr, "Usage: %s <target> <port>\n", argv[0]);
                exit(1);
        }
        return 0;
}
This C program calls the fprintf function that is defined as: int fprintf(FILE *stream, const char *format, ...);. Usually, functions will provide us with the length of the string but this is not the case so to get around this limitation .readCString() will provide us the length of the *format parameter.
const fprintfPtr = Module.getExportByName(null, "fprintf");

Interceptor.attach(fPrintfPtr, {
        onEnter (args) {
          const firstArg = args[1];
          this.bufferSize = firstArg.readCString().length + 1;
          this.arrayBuf = firstArg.readByteArray(this.bufferSize);
          this.str = String.fromCharCode.apply(null, new Uint8Array(this.arrayBuf));
          this.str = this.str.replace("target", "foobar");
          args[1] = str2ab(this.str).unwrap();
        },
});

function str2ab(str) {
  let buf = new ArrayBuffer(str.length);
  let bufView = new Uint8Array(buf);
  for (var i=0, strLen=str.length; i < strLen; i++) {
    bufView[i] = str.charCodeAt(i);
  }
  return buf;
}
To understand how this instrumentation code works we will examine it step by step.
str2ab is an auxiliary function that converts a string back to an Uint8Array.
this.bufferSize = firstArg.readCString().length + 1;
console.log("bufferSize:" + this.bufferSize);
this.arrayBuf = firstArg.readByteArray(bufferSize);
readCString() returns the contents of the format* string and gives us the length of the content (+ 1 for the null terminator). Having the size allows us to call readByteArray with the correct size.
thisstr = String.fromCharCode.apply(null, new Uint8Array(this.arrayBuf));
this.str = this.str.replace("target", "foobar");
When the ArrayBuffer is obtained by calling readByteArray we use String.fromCharCode.apply(null, new Uint8Array) to convert it to a human-readable string (you can skip this step and modify the ArrayBuffer directly).
args[1] = str2ab(this.str).unwrap();
Once the string is modified the str2ab function transforms the string back to an Uint8Array but we cannot just reassign this Uint8Array to args[1] because it is expecting a pointer. To do so, Frida has an auxiliary method called .unwrap() that returns a pointer to the first element of the ArrayBuffer.
Then, it is possible to verify the output:
frida -f a.out -l ins.js --no-pause -q
. . . .   Connected to Local System (id=local)
Spawned `a.out`. Resuming main thread!
Usage: a.out <foobar> <port>
The str2ab (String to ArrayBuffer) function is a slightly modified version of the one found in developers.google.com adapted to Uint8Arrays.